| Revision History |
|---|
Table of Contents
- 1. Installing The GPT Distribution
- 2. GPT Conventions
- 3. Installing/Updating/Uninstalling Binary Packages and Bundles with GPT
- 4. Building Source Packages and Bundles with GPT
- 5. Build Flavors
- 6. Creating a Bundle with GPT
- 7. Creating a Package with GPT: The Requirements
- 8. Creating a Package with GPT: Simple Examples
- Introduction
- GPT Scripts Used
- Perl Example: Hello World Script Package
- Perl Example: Hello World Perl Script Package With a Data File
- "C" Example : Hello World Program Package with a Makefile
- "C" Example : Hello World Program Package with Dependencies
- Testing the Example Packages
- Python Example: A Package Wrapper
- 9. Setup Packages
- 10. Packaging Concepts
- 11. GPT Build Tools
- 12. GPT Public Interface
- A. GPT Algorithms
- B. Bundle Definitions
- C. GPT Macros
List of Figures
List of Tables
- 2.1. Flavor Components
- 2.2. Flavor Examples
- 2.3. Package Name Wildcard Examples
- 6.1. Bundle Definition Elements
- 6.2. Package Types to Deployment Environment
- 6.3. Dependent Package Inclusion Control Commands
- 10.1. Version Compatibility Examples
- 10.2. Source Dependency Types
- 10.3. Build Dependency Types
- 10.4. Binary Dependency Types and Their Package Types
- 10.5. Dependency Examples
- C.1. GPT Build Macros
Table of Contents
For the majority of packaging tasks, it is sufficient to install only GPT. If you are building packages then you will need GNU Make and GNU tar in addition to GPT. If you are developing packages or building them out of a source code repository you will need to install a specific set of GNU autotools.
The following GPT scripts are used to install gpt:
- build_gpt
- Used to build and install the GPT distribution.
- gpt-config
- Used to configure GPT.
Get GPT here
Unpack the archive.
Change into the GPT subdirectory.
Set $GPT_LOCATION to the directory that you want to install GPT in.
Run the script ./build_gpt. GPT needs a perl with version 5.005 or newer. If the script cannot find this version of perl, then pass in the flag --with-perl= and the path to the proper executable
GPT uses a special set of GNU autotools for package development. Other versions of these tools can be used but the macros and scripts for GPT may not be compatible. In addition, these versions have been tested on numerous Grid platforms. These tools can be found here in the tarball called gnu_autotools_for_gpt-*.tar.gz
- Automake
This tool provides a friendly format for specifying build targets as well as set methods for building libraries, source distributions etc. GPT provides additional automake-like targets for generating filelists.
- Autoconf
This tool is the standard for probing UNIX system eccentricities. The GPT build system is encoded into autoconf macros.
- Libtool
This tool provides a platform independent way to build shared libraries.
To install the autotools simple untar the the tarball into the GPT source directory. IAW the tar command for the gnu tarball needs to be executed in the same directory as the tar command for the GPT tarball. The autotools source will be located in the support subdirectory. Then run the following in the top of the GPT source directory:
./build_gpt --autotools
As off version 3.1 GPT installs two versions of the autotools to allow packages to migrate to the latest versions. The original autools are installed in the directory $GPT_LOCATION/oldautotools. The latest version is located in $GPT_LOCATION/newautotools.
GPT relies on several system tools. The script gpt-config is used by gpt_build and the GPT RPM to locate these tools using the $PATH variable. To see what the local settings for a GPT installation is run gpt-config with the -list flag:
bash$ gpt-config -list
GNU tar located at /bin/tar
GNU zip located at /bin/gzip
GNU unzip located at /bin/gunzip
GNU make located at /usr/bin/gmake
GNU perl located at /usr/bin/perl
rpm located at /bin/rpm
rpmbuild located at /usr/bin/rpmbuild
RPM Package License set to GNU
RPM Package Vendor set to NCSA
RPM Package FTP Site set to ftp.ncsa.uiuc.edu
RPM Package URL set to http://www.gridpackaging.org
RPM Packager set to NCSA
RPM Prefix set to /usr/grid
GNU target platform set to i686-pc-linux-gnu
The listing includes a bunch of RPM information because the command was run on a linux machine. Here is what it looks like on a Solaris platform.
bash$ gpt-config -list
GNU tar located at /usr/ncsa/bin/tar
GNU zip located at /usr/ncsa/bin/gzip
GNU unzip located at /usr/ncsa/bin/gunzip
GNU make located at /usr/ncsa/bin/gmake
GNU perl located at /usr/ncsa/bin/perl
rpm located at NOT CONFIGURED
rpmbuild located at NOT CONFIGURED
RPM Package License set to N/A
RPM Package Vendor set to N/A
RPM Package FTP Site set to N/A
RPM Package URL set to N/A
RPM Packager set to N/A
RPM Prefix set to N/A
GNU target platform set to sparc-sun-solaris2.8
You can use gpt-config to change these settings. For example the following sets the location of GNU tar and asks gpt-config to probe for the rest of the settings:
bash$ gpt-config -gtar=/usr/local/bin/tar -probe
bash$ gpt-config
GNU tar located at /usr/local/bin/tar
GNU zip located at /usr/bin/gzip
GNU unzip located at /usr/bin/gunzip
GNU make located at /usr/local/bin/make
Perl located at /usr/local/bin/perl
rpm located at Not Available
rpmbuild located at Not Available
RPM Package License set to N/A
RPM Package Vendor set to N/A
RPM Package FTP Site set to N/A
RPM Package URL set to N/A
RPM Packager set to N/A
RPM Prefix set to N/A
GNU target platform set to sparc-sun-solaris2.9
gpt-config has a flag for every setting. Run gpt-config -man to get the specifics on each flag or look here.
Since GPT is mainly perl code, there is no real need to do regression testing on every platform which it is installed. However GPT uses a couple of Perl modules that are written in "C". It is a good idea to run the GPT test to try out these modules because there are occasions where these modules have problems. Unfortunately, these problems are not easily detected outside the test and can lead to unexpected behaviour.
To run the test change into the GPT source directory and execute ./build_gpt -test. This will both install and test modules used by GPT. Modules have to be installed so that higher level modules can also be tested. Here is some sample output:
bash$ ./build_gpt -test
build_gpt ====> installing GPT into /home/mbletzin/install/gpt
build_gpt ====> building support/Compress-Zlib-1.16
build_gpt ====> testing support/Compress-Zlib-1.16
make[1]: Entering directory `/home/mbletzin/nmi/gpt/support/Compress-Zlib-1.16/zlib-1.1.4'
make[1]: Leaving directory `/home/mbletzin/nmi/gpt/support/Compress-Zlib-1.16/zlib-1.1.4'
PERL_DL_NONLAZY=1 /usr/bin/perl -Iblib/arch -Iblib/lib -I/usr/lib/perl5/5.6.1/i386-linux -I/usr/lib/perl5/5.6.1 -e 'use Test::Harness qw(&runtests $verbose); $verbose=0; runtests @ARGV;' t/*.tt/examples..........ok
t/zlib..............ok
All tests successful.
Files=2, Tests=179,  1 wallclock secs ( 0.64 cusr +  0.09 csys =  0.73 CPU)
make[1]: Entering directory `/home/mbletzin/nmi/gpt/support/Compress-Zlib-1.16/zlib-1.1.4'
make[1]: Nothing to be done for `test'.
make[1]: Leaving directory `/home/mbletzin/nmi/gpt/support/Compress-Zlib-1.16/zlib-1.1.4'
build_gpt ====> building support/Archive-Tar-0.22
build_gpt ====> testing support/Archive-Tar-0.22
PERL_DL_NONLAZY=1 /usr/bin/perl -Iblib/arch -Iblib/lib -I/usr/lib/perl5/5.6.1/i386-linux -I/usr/lib/perl5/5.6.1 test.pl
1..10
ok 1
ok 2
ok 3
ok 4
ok 5
ok 6
ok 7
ok 8
ok 9
ok 10
build_gpt ====> building support/PodParser-1.18
build_gpt ====> building support/Digest-MD5-2.20
build_gpt ====> testing support/Digest-MD5-2.20
PERL_DL_NONLAZY=1 /usr/bin/perl -Iblib/arch -Iblib/lib -I/usr/lib/perl5/5.6.1/i386-linux -I/usr/lib/perl5/5.6.1 -e 'use Test::Harness qw(&runtests $verbose); $verbose=0; runtests @ARGV;' t/*.tt/badfile...........ok
t/files.............ok
t/md5-aaa...........ok
t/utf8..............ok
All tests successful.
Files=4, Tests=266,  1 wallclock secs ( 0.51 cusr +  0.07 csys =  0.58 CPU)
build_gpt ====> building packaging_tools
This output shows all of the tests passing as seen by the "ok" lines. Errors are seen as "not ok" and will include a lot of other output. If you see errors please rerun the test with the -verbose flag and sent the results to the gpt-help list. Please include the name of the platform.
Solaris machines have a unique set of problems with GPT installations. In general most of the problems with Sun platforms can be solved by installing additional GNU packages from the sun freeware site. Here are some particulars:
- Misconfigured Perl
Solaris ships with a perl executable that is built with Sun's vendor compiler. Some of the modules that GPT uses are designed as plugins to the perl executable and so need to be compiled with the tools that perl itself was built with. Unfortunately out-of-the-box Solaris machines do not include the vendor compiler which means that these modules cannot be built. The solution is to either get the Sun vendor compiler or rebuild perl with GCC.
- GPT chooses the Wrong Tar
Solaris ships with a tar program that is not compatible with GNU tar. GNU tar is what GPT bundles and packages are created with. GPT attempts to detect GNU tar from your PATH but there are times when it may choose the wrong one. To make run gpt-config -list.
GPT provides two solaris packages that contain binaries for GPT and the tools it needs. You need root access to install these packages. Here are the instructions:
Get the files GPT-3.1.gz and ToolsForGPT-1.00.gz from here
Unzip the packages by running gunzip *.gz.
install the packages by running /usr/sbin/pkgadd -vd GPT-3.1 and /usr/sbin/pkgadd -vd ToolsForGPT-1.00. pkgadd will asks you whether you want the package installed. Just type "1". The packages will be installed in /usr/grid/gpt and /usr/grid/tools_for_gpt respectively. pkgadd will ask you if you want these directories created. Just answer "y". Here is an edited example:
bash$ /usr/sbin/pkgadd -vd /export/home/mbletzin/tmp/GPT-3.1

The following packages are available:
  1  GPT     Grid Packaging Tools
             (sparc) 3.1

Select package(s) you wish to process (or 'all' to process
all packages). (default: all) [?,??,q]: 1

Processing package instance <GPT> from </export/home/mbletzin/tmp/GPT-3.1>

Grid Packaging Tools
(sparc) 3.1

This appears to be an attempt to install the same architecture and
version of a package which is already installed.  This installation
will attempt to overwrite this package.

NCSA at University of Illinois

The selected base directory </usr/grid/gpt> must exist before
installation is attempted.

Do you want this directory created now [y,n,?,q] y
Using </usr/grid/gpt> as the package base directory.
## Processing package information.
## Processing system information.
   46 package pathnames are already properly installed.
## Verifying disk space requirements.
## Checking for conflicts with packages already installed.
## Checking for setuid/setgid programs.

Installing Grid Packaging Tools as <GPT>

## Installing part 1 of 1.
/usr/grid/gpt/etc/gpt/dtd/globus_flavors.dtd
/usr/grid/gpt/etc/gpt/dtd/globus_package.dtd
[...snipped...]

[ verifying class <none> ]

Installation of <GPT> was successful.
bash$ /usr/sbin/pkgadd -vd /export/home/mbletzin/tmp/ToolsForGPT-1.00

The following packages are available:
  1  ToolsForGPT     tools needed for GPT package
                     (sparc) 1.00

Select package(s) you wish to process (or 'all' to process
all packages). (default: all) [?,??,q]: 1

Processing package instance <ToolsForGPT> from </export/home/mbletzin/tmp/ToolsForGPT-1.00>

tools needed for GPT package
(sparc) 1.00

This appears to be an attempt to install the same architecture and
version of a package which is already installed.  This installation
will attempt to overwrite this package.

NCSA at University of Illinois
Using </usr/grid/tools_for_gpt> as the package base directory.
## Processing package information.
## Processing system information.
   183 package pathnames are already properly installed.
## Verifying disk space requirements.
## Checking for conflicts with packages already installed.
## Checking for setuid/setgid programs.

Installing tools needed for GPT package as <ToolsForGPT>

## Installing part 1 of 1.
/usr/grid/tools_for_gpt/bin/a2p
/usr/grid/tools_for_gpt/bin/c2ph
/usr/grid/tools_for_gpt/bin/cpan
/usr/grid/tools_for_gpt/bin/dprofpp

[...snipped...]
After the packages are installed, gpt-config needs to be run so that it uses the tools in /usr/grid/tools_for_gpt. To do this prepend /usr/grid/tools_for_gpt/bin to your $PATH variable and set $GPT_LOCATION to /usr/grid/gpt. Then run /usr/grid/gpt/sbin/gpt-config -probe. Here is an example:
bash$ export PATH=/usr/grid/tools_for_gpt/bin/:$PATH
bash$ export GPT_LOCATION=/usr/grid/gpt
bash$ /usr/grid/gpt/sbin/gpt-config -probe
bash$ /usr/grid/gpt/sbin/gpt-config
GNU tar located at /usr/grid/tools_for_gpt/bin//tar
GNU zip located at /usr/grid/tools_for_gpt/bin//gzip
GNU unzip located at /usr/grid/tools_for_gpt/bin//gunzip
GNU make located at /usr/grid/tools_for_gpt/bin//make
Perl located at /usr/grid/tools_for_gpt/bin//perl
rpm located at Not Available
rpmbuild located at Not Available
RPM Package License set to N/A
RPM Package Vendor set to N/A
RPM Package FTP Site set to N/A
RPM Package URL set to N/A
RPM Packager set to N/A
RPM Prefix set to N/A
GNU target platform set to sparc-sun-solaris2.8
bash$
The GPT rpm is a convenient way to install GPT without having to deal with the source tarball. However there are some issues that make the rpm less portable than usual. The best solution to these problems is to install GPT from source instead:
- Hard Coded Paths
GPT embeds the paths to system executables such as perl and tar in its installed files. These paths may need to be modified. See the settings sections for details.
- Perl Version 5.7 to Version 5.8
With release 5.8 Perl has changed the way it identifies linux platforms. This change impacts, among other things, the name of the perl modules directories. Because of this, rpm's built with older versions of Perl will not work with version 5.8.
- Binary incompatibilities
GPT comes with it's own copy of the zlib library that is built inside the Compress::Zlib module. This library uses some compiler and/or operating system calls that make it incompatible when switching between Linux versions. The behaviour was noticed when using a Redhat 7.2 rpm on Redhat 8.0. However the specific incompatibility has not been tracked down yet.
There are occasions when globus releases a new globus core package on its advisories page. This package is installed as source into the $GPT_LOCATION. After you download the package, simply copy it into gpt/etc/gpt/globus_core-src.tar.gz. Not that the name of the file needs to be exactly the same.
Table of Contents
This chapter discusses the conventions that GPT has adopted. These conventions make it easier to describe and work within the grid deployment environment that GPT is designed to service.
This chapter discusses the purpose of build flavors and how they can be used. An important GPT convention is the format of the flavor label. This label is used in both package and file names. The figure here shows the components of a typical flavor name. The conventions is that any component that has the value none will contribute nothing to the label. The table here shows possible values of the flavor components. This table shows some examples
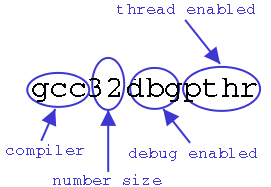
Table 2.1. Flavor Components
| Component | Values | Label | Description |
|---|---|---|---|
| Compiler | gcc | gcc | Use the GNU C compiler |
| vendorcc | vendorcc | Use the C compiler provided by the platform vendor. | |
| mpicc | mpicc | Use the wrapper script for the C compiler provided by MPI. | |
| Number Size | 32 | 32 | Compile with 32 bit integers |
| 64 | 64 | Compile with 64 bit integers | |
| Debug | dbg | dbg | Have the compiler produce debugging data inside the binary |
| nodbg | Binary will not contain debugging data. | ||
| Threads | pthr | pthr | Compiler creates binaries that use pthreads |
| solaristhreads | solthr | Compiler creates binaries that use solaris native threads | |
| nothreads | Compiler creates binaries that are not guaranteed to be thread safe. |
For GPT we adopt the definition of source and binary packages that other package managers use. Here are the formal definitions:
- Source Package
A collection of files (source code, Makefiles, etc.) that are used to build and install software. For GPT this collection is tarred up and built with gpt-build.
- Binary Package
A collection of files (programs, scripts, shared libraries, documents, etc) that have been installed into one location. Not that this collection can also include text files such as documentation and configuration files.
For example the source code from a repository or a Perl module from CPAN would be put in a source package. Any files moved into a directory by a "make install" would be part of a binary package.
Typical software projects will install several different types of files for their users. These files can range from executables, scripts, and libraries to documentation and header files. Typically a user will not require every product that a software product provides. For this reason GPT provides a capability of packaging the various installation files into a predefined set of packages. The set is defined by the following binary package types:
- pgm and pgm_static
This package type includes all executables i.e programs and scripts. the pgm_static packages contain statically linked executables.
- rtl
This package type includes runtime libraries, modules, and libexec scripts required by the executables in pgm packages.
- dev
This package type includes header files and archives required to build other software.
- data
This package type includes data files such as configuration files stored in the installation under /share or /etc.
- doc
This package type includes documentation.
Bundles containing client or server software consist of mostly pgm and rtl packages. Bundles containing software development kits consist of mostly dev and rtl packages.
GPT has a specific way to refer to binary packages. The format is shown in this figure.

GPT has some wild card conventions that allow groups of packages to be selected. Essentially you can use the asterisk character "*" for any component of the name you don't care about. In addition, If the flavor or package type is left off of the name then wildcards are assumed. See this table for some examples.
Table 2.3. Package Name Wildcard Examples
| Package Name Expression | Resulting Set of Packages |
|---|---|
| globus_foo-gcc32-pgm | Just the one package |
| globus_foo-gcc32 | All package types of globus_foo with flavor gcc32 |
| globus_foo | All package types and flavors of globus_foo |
| '*-gcc32-pgm' | All pgm packages with flavor gcc32 |
| '*-*-*' | All packages |
Table of Contents
This section talks about installing binary bundles and packages with GPT. The mechanics of installing with GPT are very simple. However, GPT gives you the flexibility to decide where to install software which occasionally require some additional thought. All of the examples in the section assume that you have installed GPT
The following GPT scripts are used for installing/updating/uninstalling packages:
- gpt-install
- Used to install and update packages and bundles.
- gpt-uninstall
- Used to remove packages and bundles.
- gpt-postinstall
- Used to run post install scripts for packages that need
them.
- gpt-verify
- Used to see if an installation is complete and coherent.
- gpt-query
- Used to search an installation for packaging data and to
compare bundles.
The linux binary bundles found in the GPT testing repository are used to demonstrate the installation procedures.
A simple installation is where a package or bundle is installed into an empty installation location. For example, here is how to install a test bundle found here. The steps shown here use the linux GPT bundle installed on a Redhat system.
Download the bundle.
Run gpt-install -location=YOUR_PREFIX newfoo-2.0-i686-pc-linux-gnu-bin.tar.gz. This installs all of the packages and stores data about the packages in $GLOBUS_LOCATION/etc/globus_packages. You should see something like this:
bash$ gpt-install -location=/home/mbletzin/install/globus/ newfoo-2.2.3-i686-pc-linux-gnu-bin.tar.gz
Bundle newfoo successfully installed.
gpt-query shows you what packages where installed:
bash$ gpt-query
16 packages were found in /home/mbletzin/install/globus that matched your query:
packages found that matched your query
	globus_common-gcc32-pgm pkg version: 3.5.0
	globus_common-gcc32-rtl pkg version: 3.5.0
	globus_common_setup-noflavor-pgm pkg version: 2.1.0
	globus_gsi_callback-gcc32-rtl pkg version: 0.3.0
	globus_gsi_cert_utils-gcc32-pgm pkg version: 0.4.0
	globus_gsi_cert_utils-gcc32-rtl pkg version: 0.4.0
	globus_gsi_credential-gcc32-rtl pkg version: 0.5.0
	globus_gsi_openssl_error-gcc32-rtl pkg version: 0.2.0
	globus_gsi_proxy_core-gcc32-rtl pkg version: 0.3.0
	globus_gsi_proxy_ssl-gcc32-rtl pkg version: 0.1.0
	globus_gsi_sysconfig-gcc32-rtl pkg version: 0.3.0
	globus_openssl-gcc32-pgm pkg version: 0.10.0
	globus_openssl-gcc32-rtl pkg version: 0.10.0
	globus_openssl_module-gcc32-rtl pkg version: 0.2.0
	globus_proxy_utils-gcc32-pgm pkg version: 0.5.0
	globus_trusted_ca_42864e48_setup-noflavor-pgm pkg version: 0.5.0
The -what-bundles flag shows the installed bundle
bash$ gpt-query -what-bundles
System Bundles
	newfoo ver: 2.2.3
Run gpt-postinstall to execute any post install scripts that need to be run. You should see something like this:
bash$ gpt-postinstall
"running" message shows which setup script is running
running /home/mbletzin/install/globus/setup/globus/setup-globus-common...
creating globus-sh-tools-vars.sh
creating globus-script-initializer
creating Globus::Core::Paths
checking globus-hostname
Done
running /home/mbletzin/install/globus/setup/globus/setup-ssl-utils...
setup-ssl-utils: Configuring ssl-utils package
Running setup-ssl-utils-sh-scripts...
Occasionally packages will require additional scripts to be run.*************************************************************************** Note: To complete setup of the GSI software you need to run the following script as root to configure your security configuration directory: /home/mbletzin/install/globus/setup/globus/setup-gsi For further information on using the setup-gsi script, use the -help option. The -nonroot can be used on systems where root access is not available. *************************************************************************** setup-ssl-utils: Complete
Run gpt-verify to make sure that the installation is correct. You should see something like this:
bash$ gpt-verify
This reports if there are packages missing from an installed bundle or if there are package version mis-matches. Nothing to report for now.
Verifying Bundles...
Bundle: newfoo
This reports if there are any missing or version mis-matches with packages that are required by other packages.
Verifying run-time dependencies...
The above reports if any setup packages which contain configuration files and scripts for other packages are missing.
Verifying setup dependencies...

Verifying setup packages...
The following setup packages still need to be configured via gpt-postinstall:
	globus_trusted_ca_42864e48_setup-noflavor-pgm

ERROR: The collection of packages in /home/mbletzin/install/globus is not coherent!
The error comes from the fact that the /home/mbletzin/install/globus/setup/globus/setup-gsi script mentioned in the gpt-postinstall output had not been run. After running this script gpt-verify is satisfied:
bash$ gpt-verify
Verifying Bundles...
Bundle: newfoo

Verifying run-time dependencies...

Verifying setup dependencies...

Verifying setup packages...

The collection of packages in /home/mbletzin/install/globus appear to be coherent.
To remove the bundle from the previous example run gpt-uninstall with the name of the bundle:
bash$ gpt-uninstall -bundles newfoo
Bundle newfoo removed.
bash$ gpt-query
No packages were found that matched your query.
Since bundles are versioned in the same way packages, upgrading a bundle can be done by simply by running gpt-install on the newer bundle. However, there are a lot of things that happen under automatically with this operation. For this reason, the following example shows some switches that can be used to see more details of what GPT is doing.
Download the bundles newfoo-2.0-i686-pc-linux-gnu-bin.tar.gz and newfoo-2.2.3-i686-pc-linux-gnu-bin.tar.gz from the test site.
Run gpt-install newfoo-2.0-i686-pc-linux-gnu-bin.tar.gz.
For the first update use the -noaction switch. This shows what a gpt-install operation does without actually doing it. Run gpt-install -noaction newfoo-2.2.3-i686-pc-linux-gnu-bin.tar.gz. You should see the following:
bash$ gpt-install -noaction newfoo-2.2.3-i686-pc-linux-gnu-bin.tar.gz
The following bundles would be removed
	newfoo ver: 2.0
The following bundles would be installed
	newfoo ver: 2.2.3
The following packages would be removed
	globus_ssl_utils_setup-noflavor-pgm ver: 2.0
	globus_ssl_utils-gcc32-rtl ver: 2.1
	globus_ssl_utils-gcc32-pgm ver: 2.1
	globus_openssl-gcc32-rtl ver: 0.1
	globus_openssl-gcc32-pgm ver: 0.1
	globus_core_setup-noflavor-pgm ver: 2.0
	globus_common_setup-noflavor-pgm ver: 2.0
	globus_common-gcc32-rtl ver: 2.0
	globus_common-gcc32-pgm ver: 2.0
The following packages would be installed
	globus_trusted_ca_42864e48_setup-noflavor-pgm ver: 0.5
	globus_proxy_utils-gcc32-pgm ver: 0.5
	globus_openssl_module-gcc32-rtl ver: 0.2
	globus_openssl-gcc32-rtl ver: 0.10
	globus_openssl-gcc32-pgm ver: 0.10
	globus_gsi_sysconfig-gcc32-rtl ver: 0.3
	globus_gsi_proxy_ssl-gcc32-rtl ver: 0.1
	globus_gsi_proxy_core-gcc32-rtl ver: 0.3
	globus_gsi_openssl_error-gcc32-rtl ver: 0.2
	globus_gsi_credential-gcc32-rtl ver: 0.5
	globus_gsi_cert_utils-gcc32-rtl ver: 0.4
	globus_gsi_cert_utils-gcc32-pgm ver: 0.4
	globus_gsi_callback-gcc32-rtl ver: 0.3
	globus_common_setup-noflavor-pgm ver: 2.1
	globus_common-gcc32-rtl ver: 3.5
	globus_common-gcc32-pgm ver: 3.5
The output shows the bundles and packages that will be added and removed. Bundles are only removed by gpt-install if they are being replaced by a newer version of the bundle. Removed packages are either being replaced by a newer version or removed because they are no longer part of the bundle being updated.
Now you do the real update. For this we use the -verbose switch which shows details of what gpt-install is doing. Run gpt-install -verbose newfoo-2.2.3-i686-pc-linux-gnu-bin.tar.gz. You should see the following:
bash$ gpt-install -verbose newfoo-2.2.3-i686-pc-linux-gnu-bin.tar.gz
globus_ssl_utils_setup-noflavor-pgm successfully removed.
globus_ssl_utils-gcc32-rtl successfully removed.
globus_ssl_utils-gcc32-pgm successfully removed.
globus_openssl-gcc32-rtl successfully removed.
globus_openssl-gcc32-pgm successfully removed.
globus_core_setup-noflavor-pgm successfully removed.
globus_common_setup-noflavor-pgm successfully removed.
globus_common-gcc32-rtl successfully removed.
globus_common-gcc32-pgm successfully removed.
Bundle newfoo removed.
globus_trusted_ca_42864e48_setup-noflavor-pgm successfully installed.
globus_proxy_utils-gcc32-pgm successfully installed.
globus_openssl_module-gcc32-rtl successfully installed.
globus_openssl-gcc32-rtl successfully installed.
globus_openssl-gcc32-pgm successfully installed.
globus_gsi_sysconfig-gcc32-rtl successfully installed.
globus_gsi_proxy_ssl-gcc32-rtl successfully installed.
globus_gsi_proxy_core-gcc32-rtl successfully installed.
globus_gsi_openssl_error-gcc32-rtl successfully installed.
globus_gsi_credential-gcc32-rtl successfully installed.
globus_gsi_cert_utils-gcc32-rtl successfully installed.
globus_gsi_cert_utils-gcc32-pgm successfully installed.
globus_gsi_callback-gcc32-rtl successfully installed.
globus_common_setup-noflavor-pgm successfully installed.
globus_common-gcc32-rtl successfully installed.
globus_common-gcc32-pgm successfully installed.
Bundle newfoo successfully installed.
A gpt-install operation without the verbose switch will show only the bundle messages..
Usually it is possible to install multiple bundles into the same location if they originate from the same organization. However there are times when certain bundles will conflict. Here are some examples:
This example shows conflicts because of mismatched package versions:
bash$ gpt-install newfoo-2.0-i686-pc-linux-gnu-bin.tar.gz
ERROR: The following bundles cannot be installed
	newfoo ver: 2.0 is incompatible installed newfoo ver: 2.2.3
bash$ gpt-install newfee-2.0-i686-pc-linux-gnu-bin.tar.gz
Error: The following package conflicts were found:
	globus_openssl-gcc32-rtl ver: 0.1 in bundle newfee conflicts with globus_openssl-gcc32-rtl ver: 0.10 in bundle newfoo
	globus_openssl-gcc32-pgm ver: 0.1 in bundle newfee conflicts with globus_openssl-gcc32-pgm ver: 0.10 in bundle newfoo
	globus_common_setup-noflavor-pgm ver: 2.0 in bundle newfee conflicts with globus_common_setup-noflavor-pgm ver: 2.1 in bundle newfoo
	globus_common-gcc32-rtl ver: 2.0 in bundle newfee conflicts with globus_common-gcc32-rtl ver: 3.5 in bundle newfoo
	globus_common-gcc32-pgm ver: 2.0 in bundle newfee conflicts with globus_common-gcc32-pgm ver: 3.5 in bundle newfoo
This example shows conflicts because of mismatched package flavors:
bash$ gpt-install newfee_static-2.2.3-i686-pc-linux-gnu-bin.tar.gz
Error: The following package conflicts were found:
	globus_proxy_utils-gcc32-pgm_static ver: 0.5 in bundle newfee_static conflicts with globus_proxy_utils-gcc32-pgm ver: 0.5 in bundle newfoo
	globus_openssl-gcc32-pgm_static ver: 0.10 in bundle newfee_static conflicts with globus_openssl-gcc32-pgm ver: 0.10 in bundle newfoo
	globus_gsi_cert_utils-gcc32-pgm_static ver: 0.4 in bundle newfee_static conflicts with globus_gsi_cert_utils-gcc32-pgm ver: 0.4 in bundle newfoo
	globus_common-gcc32-pgm_static ver: 3.5 in bundle newfee_static conflicts with globus_common-gcc32-pgm ver: 3.5 in bundle newfoo
A -force flag can be used to install bundles which cause conflicts:
bash$ gpt-install -force newfee_static-2.2.3-i686-pc-linux-gnu-bin.tar.gz
Bundle newfee_static successfully installed.
bash$ gpt-verify
Verifying Bundles...
Bundle: newfoo
Package globus_trusted_ca_42864e48_setup-noflavor-pgm ver: 0.5 is missing from i
nstallation
Package globus_proxy_utils-gcc32-pgm ver: 0.5 is missing from installation
Package globus_openssl-gcc32-pgm ver: 0.10 is missing from installation
Package globus_gsi_cert_utils-gcc32-pgm ver: 0.4 is missing from installation
Package globus_common_setup-noflavor-pgm ver: 2.1 is missing from installation
Package globus_common-gcc32-pgm ver: 3.5 is missing from installation

Bundle: newfee_static

Verifying run-time dependencies...

Verifying setup dependencies...

Verifying setup packages...
The following setup packages still need to be configured via gpt-postinstall:
	globus_common_setup-noflavor-pgm_static
	globus_trusted_ca_42864e48_setup-noflavor-pgm_static

ERROR: The collection of packages in /home/mbletzin/install/globus is not cohere
nt!
Under normal circumstances, GPT strictly inforces the integrity of installed bundles. However some organizations would rather distribute individual packages as "patches" to bundles. For this reason, gpt-install will allow updated packages to be installed that violate installed bundle integrity. The following shows how package updates work.
Start with an empty installation location. Download the bundle newfoo-2.0-i686-pc-linux-gnu-bin.tar.gz and the packages globus_common-3.5-i686-pc-linux-gnu-gcc32-pgm.tar.gz and globus_common-3.5-i686-pc-linux-gnu-gcc32-rtl.tar.gz.
Run gpt-install -location=YOUR_PREFIX newfoo-2.0-i686-pc-linux-gnu-bin.tar.gz and gpt-postinstall.
Run gpt-install -location=YOUR_PREFIX globus_common-3.5-i686-pc-linux-gnu-gcc32-pgm.tar.gz globus_common-3.5-i686-pc-linux-gnu-gcc32-rtl.tar.gz.
Run gpt-verify Notice that the script shows version mis-matches for the bundle newfoo. It also shows dependency problems indicating that this was not a well designed update.
bash$ gpt-verify
Verifying Bundles...
Bundle: newfoo
Package globus_common-gcc32-rtl ver: 2.0 is a mis-match with the following installed packages
	globus_common-gcc32-rtl ver: 3.5
Package globus_common-gcc32-pgm ver: 2.0 is a mis-match with the following installed packages
	globus_common-gcc32-pgm ver: 3.5

Verifying run-time dependencies...
ERROR: The following packages are missing
Package Runtime-globus_common-ANY-pgm version 3.5 is incompatible with globus_common_setup-noflavor-pgm
The trick to installing update bundles is that they need to be installed all at the same time. If they aren't then GPT may complain about version mis-matches of packages that are shared between the bundles and refuse to do the upgrade. The following exercise illustrates this:
Start with an empty installation location. Download the bundles newfoo-2.0-i686-pc-linux-gnu-bin.tar.gz, newfee-2.0-i686-pc-linux-gnu-bin.tar.gz, newfoo-2.2.3-i686-pc-linux-gnu-bin.tar.gz, and newfee-2.2.3-i686-pc-linux-gnu-bin.tar.gz.
Run gpt-install newfoo-2.0-i686-pc-linux-gnu-bin.tar.gz newfee-2.0-i686-pc-linux-gnu-bin.tar.gz to install the older set of bundles.
Run gpt-install newfoo-2.2.3-i686-pc-linux-gnu-bin.tar.gz to install one bundle upgrade and see the following complaint:
bash$ gpt-install newfoo-2.2.3-i686-pc-linux-gnu-bin.tar.gz
ERROR: The following package conflicts were found:
	globus_openssl-gcc32-rtl ver: 0.10 in bundle newfoo conflicts with globus_openssl-gcc32-rtl ver: 0.1 in bundle newfee
	globus_openssl-gcc32-pgm ver: 0.10 in bundle newfoo conflicts with globus_openssl-gcc32-pgm ver: 0.1 in bundle newfee
	globus_common_setup-noflavor-pgm ver: 2.1 in bundle newfoo conflicts with globus_common_setup-noflavor-pgm ver: 2.0 in bundle newfee
	globus_common-gcc32-rtl ver: 3.5 in bundle newfoo conflicts with globus_common-gcc32-rtl ver: 2.0 in bundle newfee
	globus_common-gcc32-pgm ver: 3.5 in bundle newfoo conflicts with globus_common-gcc32-pgm ver: 2.0 in bundle newfee
This shows the shared package version mis-match which requires bundle upgrades to be installed at the same time.
Run gpt-install newfoo-2.2.3-i686-pc-linux-gnu-bin.tar.gz newfee-2.2.3-i686-pc-linux-gnu-bin.tar.gz to install the bundle upgrades at the same time..
Frequently an installation is used to build other software. The bundles for this are called software development kits (SDK) and are a collection of 'dev' and 'rtl' packages. For this type of installation, an additional step is required to install whatever build flavors are needed. To install a set of flavors do the following:
gpt-build -nosrc LIST OF FLAVORS
If you have no idea what flavors are needed then do the following:
gpt-build -nosrc -std-flavors
GPT also supports bundles that contain rpm's. These bundles are installed and uninstalled in the same way as normal GPT bundles. GPT keeps track of which packages are RPM's and which are GPT.
Bundles created with versions of GPT older than 3.0 are treated differently because they are not versioned. For one thing these older bundles cannot be updated; only installed and uninstalled. Another difference is that many of the package conflicts are ignored by gpt-install to replicate the behaviour of the older GPT's. Here are some examples to illustrate the differences:
This example shows how gpt-install installs two bundles which have package conflicts. When bundle foo_dbg-2 is installed then the packages that are conflicting are ignored. The result is that the integrity of the bundle is lost. Using the -force flag causes the opposite behaviour. The installed bundle foo-2 would loose its integrity.
bash$ gpt-install foo-2.2.3-i686-pc-linux-gnu-bin.tar.gz
Bundle foo-2 successfully installed.
bash$ gpt-install foo_dbg-2.2.3-i686-pc-linux-gnu-bin.tar.gz
Bundle foo_dbg-2 successfully installed.
bash$ gpt-verify
Verifying Bundles...
Bundle: foo-2

Bundle: foo_dbg-2
Package globus_openssl-gcc32dbg-pgm ver: 0.10 is missing from installation
Package globus_common-gcc32dbg-pgm ver: 3.5 is missing from installation
Package globus_gsi_cert_utils-gcc32dbg-pgm ver: 0.4 is missing from installation
Package globus_proxy_utils-gcc32dbg-pgm ver: 0.5 is missing from installation
This example shows that gpt-install still pays attention to package versions. Bundles that contain conflicting versions cannot be installed without the -force flag.
bash$ gpt-install foo-2.2.3-i686-pc-linux-gnu-bin.tar.gz
Bundle foo-2 successfully installed.
bash$ gpt-install fee-2.0-i686-pc-linux-gnu-bin.tar.gz
Error: The following package conflicts were found:
	globus_common-gcc32-rtl ver: 2.0 in bundle fee-2 conflicts with globus_common-gcc32-rtl ver: 3.5 in bundle foo-2
	globus_openssl-gcc32-pgm ver: 0.1 in bundle fee-2 conflicts with globus_openssl-gcc32-pgm ver: 0.10 in bundle foo-2
	globus_openssl-gcc32-rtl ver: 0.1 in bundle fee-2 conflicts with globus_openssl-gcc32-rtl ver: 0.10 in bundle foo-2
	globus_common-gcc32-pgm ver: 2.0 in bundle fee-2 conflicts with globus_common-gcc32-pgm ver: 3.5 in bundle foo-2
	globus_common_setup-noflavor-pgm ver: 2.0 in bundle fee-2 conflicts with globus_common_setup-noflavor-pgm ver: 2.1 in bundle foo-2
Table of Contents
This section discusses building source packages and bundles with GPT. Building packages and bundles is more difficult than installing their binary equivelent. However it does allow the software to be patched and installed on platforms where binaries are not available. GPT has been designed to provide a number of tools that allow for building problems to be debugged and fixed. The focus of this section is to show the various building techniques rather than attempting to solve all building problems. In addition, this section spends some time discussing the difference between an installation that was built and an installation that was installed via binary packages and bundles. All of the examples in the section assume that you have installed GPT
The following GPT scripts are used for building packages:
- gpt-build
- Used to build packages and bundles.
- gpt-uninstall
- Used to remove packages and bundles.
- gpt-verify
- Used to see if an installation is complete and coherent.
- gpt-query
- Used to search an installation for packaging data and to
compare bundles.
The source bundles and packages found in the GPT testing repository are used to demonstrate the installation procedures. The source package is globus_common-3.5.tar.gz, and the source bundle is globus-data-management-server-2.2.3-src_bundle.tar.gz
gpt-build accepts flavors, packages, and bundles for input and the builds all of the packages and bundles with all of the flavors. Each flavor is built in the same source directory of a package. To build the globus_common package you star with an empty $GLOBUS_LOCATION and run gpt-build gcc32 gcc32pthr globus_common-3.5.tar.gz. What you see is actually two packages being built with the two flavors. The globus_core package is used to install flavor specific files into $GLOBUS_LOCATION which are then used to help build the other packages. See this section for details. Here are some comments on the build output:
The following is a package removal message:
gpt-build ====> REMOVING empty package globus_core-gcc32-pgm_static
Each source package builds several binary packages types. However not all package types are built. In this case the package was built using dynamic linking which means that the static binary package is empty.
The following is noise that should be ignored. The make distclean command is needed to clean out a previous flavor. In this case there was no previous flavor.
 make distclean
make: *** No rule to make target `distclean'.  Stop.
The previous example left behind a BUILD subdirectory. Inside this subdirectory are the unpacked source packages that were built. You can build more flavors of globus_common by running gpt-build -srcdir=globus_common-3.5 gcc32 gcc32dbg gcc32dbgpthr. You can see that gpt-build skips over the gcc32 flavor because it was built previously. Reinstalling the same flavor of a package can be done through the -force flag.
The -verbose flag tells gpt-build to print out all of the details of the build. Run the command gpt-build -force -verbose -srcdir=globus_common-3.5 gcc32 to see this. As you can see gpt-build actually builds the globus_common package using the normal ./configure, make, and make install commands. Other packages may have slightly different commands.
In your original working directory run the command gpt-build gcc32 gcc32dbg -log bundles/globus-data-management-server-2.2.3-src_bundle.tar.gz and then go on a coffee break :). This command creates a ./logs directory which contains the a log file for each package that was built. The file gpt-build.log is the overall log file that shows which package was built when.
After the bundle build is completed you can run the gpt-postinstall and get a working installation. There are some differences though. A gpt-query -what-bundles shows that the globus-data-management-server bundle definition file was not installed. This is a limitation of the current version of gpt-build. In addition a gpt-query globus_common command reveals that there are 4 different flavors of the 'pgm' package installed. These packages in a normal installation would cause file conflicts. However for a built installation gpt-build saves a copy of each file in a flavored location. If you look at for example the $GLOBUS_LOCATION/bin directory, you will see the program globus-hostname in the bin directory and also in the bin/gcc32/shared directory. The flavor of the globus_hostname program that is in the bin directory is the last flavor built which in this case is gcc32dbg. The easiest way to switch the flavor is to run gpt-pkg. For example the command gpt-pkg globus_common-gcc32-pgm will switch the flavor to gcc32 as a side effect of creating a GPT package.
After the bundle building of the previous section, the ./BUILD directory contains a lot more files and subdirectories. In addition to the source packages and source directories, the directory now contains a couple of files related to the bundle itself. It is better to use this set of directories to rebuild packages because using the bundle tarfile will unpack everything again and wipe out any changes made in these directories. The new package directories can be used to rebuild patched packages as shown in the following operation on the package globus_io:
Determine what flavors of globus_io are installed.
bash$ gpt-query 'globus_io-*-rtl'
2 packages were found in /home/mbletzin/install/globus that matched your query:

packages found that matched your query
	globus_io-gcc32-rtl pkg version: 3.3.0
	globus_io-gcc32dbg-rtl pkg version: 3.3.0
Remove all of the globus_io packages. You will need to use the -force flag. In most cases this step is not necessary. You can use the -force flag with gpt-build to overwrite an installed packages. However, using gpt-uninstall makes sure that all of the installed files are removed.
bash$ gpt-uninstall -verbose globus_io
The following packages fulfill dependencies to other installed
packages and so will not be removed
	globus_io-gcc32-dev is needed by the following packages:
		globus_ftp_control-gcc32-dev
	globus_io-gcc32-rtl is needed by the following packages:
		globus_ftp_control-gcc32-rtl
	globus_io-gcc32dbg-dev is needed by the following packages:
		globus_ftp_control-gcc32dbg-dev
	globus_io-gcc32dbg-rtl is needed by the following packages:
		globus_ftp_control-gcc32dbg-rtl

ERROR: No packages were removed
bash$ gpt-uninstall -force globus_io
bash$
After making the changes, rebuild the package with the installed flavors:
bash$ cd BUILD/globus_io-3.3
bash$ gpt-build gcc32 gcc32dbg
gpt-build ====> CHECKING BUILD DEPENDENCIES FOR globus_io
gpt-build ====> Changing to /home/mbletzin/work/doc-bundles/BUILD/globus_io-3.3
gpt-build ====> BUILDING FLAVOR gcc32
gpt-build ====> Changing to /home/mbletzin/install/globus/etc
gpt-build ====> REMOVING empty package globus_io-gcc32-pgm
gpt-build ====> REMOVING empty package globus_io-gcc32-pgm_static
gpt-build ====> Changing to /home/mbletzin/work/doc-bundles/BUILD/globus_io-3.3
gpt-build ====> BUILDING FLAVOR gcc32dbg
gpt-build ====> Changing to /home/mbletzin/install/globus/etc
gpt-build ====> REMOVING empty package globus_io-gcc32dbg-pgm
gpt-build ====> REMOVING empty package globus_io-gcc32dbg-pgm_static
gpt-build ====> REMOVING empty package globus_io-noflavor-data
gpt-build ====> REMOVING empty package globus_io-noflavor-doc
Rebuilding multiple packages in a bundle is trickier because the packages need to be fed into gpt-build in dependency order. The file packaging_list lists the package names in dependency order so this list can be used to order the package source directories. For those of you who are too lazy to write your own, you can use this script.
gpt-build by default will build a package if it is newer than the installed version. However, the script does not use the same algorithm as gpt-install. Because of this it will not do bundle upgrades, nor will it remove packages that are no longer defined in a new bundle.
Table of Contents
A build flavor is a label that describes the set of build options used to build a binary package. There are a number of build options implemented by both compilers and linkers that can lead to binary incompatibilities when they are not invoked consistently for an application and all of its supporting libraries. Thread support, number sizes, and the message passing interface (MPI) packages are some examples of these types of build options. An executable that is linked with a library that was build with a different set of build options will not behave as expected and frequently fail. GPT provides a means of describing and managing these options through the use of build flavors. The conventions that GPT uses for build flavors are discussed here
The relationship between the components of the flavor label and the build options are set in the file $GPT_LOCATION/etc/gpt/globus_flavor_labels.conf. The package globus_core translates the definitions in this file into a build environment that can be accessed by the tools gpt_build_config and globus-makefile-header. The tool gpt-build can translate translate build options into options that a packages configure script can understand.
The flavor translation, which happens the globus_core package is configured is a two stage process. First GPT uses the globus_flavor_labels.conf file to translate a flavor label into a set of shell variables and command line switches that globus_core's configure understands. This script then uses autoconf style probing to verify the flavor and then sets up files that define the build environment. These files are then installed with the make install command. All of this happens automatically when gpt-build is invoked with a new flavor.
There are two ways that the build flavors can be customized. The first is to build globus_core manually. The second way involves editing the globus_flavor_labels.conf file.
Currently the only way to create a custom flavor definition with your own flavor label is to build the globus_core source package manually. The package is located at $GPT_LOCATION/etc/gpt/globus_core.tar.gz. Untar this package into your working directory and the change into the resulting subdirectory.
As was mentioned previously, the flavor definition is fed into globus_core using shell variable settings and command switches. The command list of command switches can be seen by executing
./configure --help
. The list of shell variables is documented internally in globus_core in the file config/accompiler.m4. The most important switch is the --with-flavor=label which sets the flavor label. Here is an example configure command
CC=gcc; export CC; \
LDFLAGS='-L/home/mbletzin/install/globus/lib'; export LDFLAGS; \
./configure  --with-flavor=kumquat --enable-debug --with-threads=pthreads
In this case the flavor kumquat is defined with the C compiler set to gcc, the thread package of pthreads, and debug enabled.
After the configure command is executed, run
make
and
make install
to install the flavor.
The globus_flavor_label.conf file is an XML file that matches flavor label components with inputs to the configure script that is executed to build the globus_core package. The DTD for this file is found here. A flavor definition is essentially a list of flavor choices encapsulated by a flavors element. Each flavor_choice element contains a number of config which define a possible value of the flavor choice with their attributes. The following shows what the different attributes are for:
- switch
This attribute contains the input that needs to be passed into globus_core's configure script to set this value. Inputs to globus_core's configure script consists of shell variables and command line switches.
- label
This attribute contains the text used to create a flavor label.
- nolabel
This attribute asserts that this particular value is the default value for the flavor choice.
- std
This attribute defines whether the value should be include in the standard list flavors. This flavor list is used by gpt-build when the -std-flavors switch is used.
Here are a couple of example flavor choices:
<flavor_choice>
<config std="yes" switch="CC=gcc" label="gcc"/>
<config std="yes" switch="CC=cc" label="vendorcc"/>
</flavor_choice>
This choice has two settings gcc and vendorcc. Both of the settings set the CC shell variable, add text to the flavor label, and are included in the standard flavor list.
<flavor_choice>
<config std="yes" switch="--with-threads=pthreads" label="pthr"/>
<config std="no" switch="--with-threads=solaristhreads" label="solthr"/>
<config std="yes" nolabel="nothreads"/>
</flavor_choice>
This choice has three settings. The first two (pthr and solthr) set a command line switch and add text to the flavor label. The third setting ( nothreads ) assumes the default thread package setting for configure and does not add anything to the flavor label. Only the first and third setting are included in the standard flavor list.
Several limitations on build flavors exist because of the way build flavors are currently implemented in GPT.
- Build Flavors are for the "C" Programing Language
The current flavor labels defined in globus_flavor_labels.conf provide definitions for "C" compilers and linkers. Other compilers and linkers (such as C++ and Fortran) are probed by the globus_core packages and the results are provided for a build environment. However this data cannot be managed by the flavors.
- Standard Flavor Label Name Assumes an Order
The flavor label is parsed in such a way that the compiler, byte size, debug, thread package order is assumed. The label format was designed in such a way so that it could be used in file and package names.
- Flavor Mixing is not Supported.
GPT assumes that any two binaries that are built using different flavors are incompatible. Under some circumstances that may not be true. For example compiler wrappers such as those provided by MPI and code profiling tools (see here for how this is done) may produce binaries that are compatible with ordinary compilers. However GPT does not provide any direct way to mix binaries produced by these tools with other flavors.
- Flavor Compatibility is not Supported.
Along the same lines a flavor mixing, GPT does not currently support any method of checking the equivelence of flavors. Compatibility is currently only assured if the labels are the same.
Table of Contents
This section discusses how to create bundles. Bundles can contain either source packages or binary packages. This section discusses the creation of both.
The GPT script is used to bundle packages gpt-bundle is used to create binary and sources packages as well as bundle definition files. The GPT script gpt-pkg can be used to create binary packages that are stand alone.
Binary bundles are created from an installation. Therefore it is simple to build a collection of packages, do some validation testing, and then wrap them up in a bundle. The following exercise shows how this is done although we will cheat by installing binary packages rather than building them from source.
Download this bundle.
Set $GPT_INSTALL_LOCATION to an empty location and run gpt-install foo-2.2.3-i686-pc-linux-gnu-bin.tar.gz
Run gpt-bundle -all -bn=newfoo -bv=1.0 -bl=2.0. This will create a bundle called newfoo-2.0-i686-pc-linux-gnu-bin.tar.gz.
Unpack the bundle into an empty directory and check the contents. You should see the following files:
The bundle definition file:
newfoo-2.0.gpt-bundle.xml
The binary packages:
globus_common-3.5-i686-pc-linux-gnu-gcc32-pgm.tar.gz
globus_common-3.5-i686-pc-linux-gnu-gcc32-rtl.tar.gz
globus_common_setup-2.1-i686-pc-linux-gnu-noflavor-pgm.tar.gz
globus_gsi_callback-0.3-i686-pc-linux-gnu-gcc32-rtl.tar.gz
globus_gsi_cert_utils-0.4-i686-pc-linux-gnu-gcc32-pgm.tar.gz
globus_gsi_cert_utils-0.4-i686-pc-linux-gnu-gcc32-rtl.tar.gz
globus_gsi_credential-0.5-i686-pc-linux-gnu-gcc32-rtl.tar.gz
globus_gsi_openssl_error-0.2-i686-pc-linux-gnu-gcc32-rtl.tar.gz
globus_gsi_proxy_core-0.3-i686-pc-linux-gnu-gcc32-rtl.tar.gz
globus_gsi_proxy_ssl-0.1-i686-pc-linux-gnu-gcc32-rtl.tar.gz
globus_gsi_sysconfig-0.3-i686-pc-linux-gnu-gcc32-rtl.tar.gz
globus_openssl-0.10-i686-pc-linux-gnu-gcc32-pgm.tar.gz
globus_openssl-0.10-i686-pc-linux-gnu-gcc32-rtl.tar.gz
globus_openssl_module-0.2-i686-pc-linux-gnu-gcc32-rtl.tar.gz
globus_proxy_utils-0.5-i686-pc-linux-gnu-gcc32-pgm.tar.gz
globus_trusted_ca_42864e48_setup-0.5-i686-pc-linux-gnu-noflavor-pgm.tar.gz
A package list file used by older versions of GPT:
packagelist
This bundle is now ready to be installed by gpt-install.
The file newfoo-2.0.gpt-bundle.xml from the previous example is a typical bundle definition file. It is in an XML document that follows this DTD. The bundle definition file is not only a product of gpt-bundle but can also be an input. The file can be used as a template for a group of bundles. With this use, the data in the file is overriden by gpt-bundle command line options.
Lets take a closer look at the definition file.
<?xml version="1.0" encoding="UTF-8"?>
<!DOCTYPE GPTBundleData SYSTEM "gpt_bundle.dtd">
<GPTBundleData Name="newfoo" >
<BundleInfo >
<Description >EMPTY</Description>
<ContactInfo ContactEmail="EMPTY" ContactName="EMPTY" />
<BundleDocs BundleDocsDesc="EMPTY" BundleDocsURL="EMPTY" />
</BundleInfo>
<BundleReleaseInfo >
<BundleStability Release="EMPTY" />
<BundleVersion Age="0" Major="1" Minor="0" />
<VersionLabel >2.0</VersionLabel>
<TypeOfBundle ContentsType="gpt" />
</BundleReleaseInfo>
This section is the top of the definition file and contains data that pertains to the bundle as a whole. For this particular file, several of the elements contain "EMPTY" which indicates that they need to be edited. As mentioned previously, several of these elements can also be set from the gpt-bundle command line. The following table describes these elements.
Table 6.1. Bundle Definition Elements
| Element or Attribute | Description | gpt-bundle Command Line Switch |
|---|---|---|
| GPTBundleData Name | Name of the bundle | -bn="NAME" |
| ContactInfo ContactEmail | Email address for questions about the bundle | None |
| ContactInfo ContactName | Name of the bundle owner | None |
| BundleDocs BundleDocsDesc | Explanation on how to get documentation on the bundle | None |
| BundleDocs BundleDocsURL | URL to online bundle documentation | None |
| BundleStability Release | Stability of the software released with this bundle. Usually one of "Experimental", "Alpha", "Beta", or "Production" | -bs="STABILITY" |
| BundleVersion Age, Major, and Minor | GPT internal version number of the bundle. Age is not currently used | -bv="MAJOR.MINOR" |
| VersionLabel | The user friendly version number of the bundle. Can be any CDATA string. | -bl="LABEL" |
The element TypeOfBundle is generated by GPT.
The next section is a list of packages:
<PackageList >
<IncludedPackages >
<Package PackageFlavor="gcc32" PackageName="globus_common" PackageType="pgm" PackageVersion="3.5" />
<Package PackageFlavor="gcc32" PackageName="globus_common" PackageType="rtl" PackageVersion="3.5" />
<Package PackageFlavor="noflavor" PackageName="globus_common_setup" PackageType="pgm" PackageVersion="2.1" />
<Package PackageFlavor="gcc32" PackageName="globus_gsi_callback" PackageType="rtl" PackageVersion="0.3" />
<Package PackageFlavor="gcc32" PackageName="globus_gsi_cert_utils" PackageType="pgm" PackageVersion="0.4" />
Each package is listed with its build flavor, package name, and GPT version. The version is of the form MAJOR.MINOR. The version listed in the definition is overidden by the version of the package actually found in the installation when the bundle definition file is regenerated by gpt-bundle. Packages can also be added to this section by listing them on the command line.
<ExcludedPackages >
</ExcludedPackages>
This section has the same format as IncludedPackages but lists packages that should be excluded. The default behavior for gpt-bundle is to bundle the entire dependency tree of an included package. Listing packages in the ExcludedPackages section allows the dependency to be pruned. Packages can also be added to this section by using the gpt-bundle command line switch -exclude='PACKAGE_NAME'.
gpt-bundle allows you to specify a template definition that can be used to generate multiple bundles that have elements in common. Any bundle definition (such as the one generated in the previous section) can serve as a template. A completely generic template can be generated with the command gpt-bundle -template. The resulting template is in a file called BundleTemplateXML_FILE.xml. The following exercise shows how to use a template to generate different bundles:
Edit the bundle definition file. You can see the edited version here. Default data has been filled in for the ContactInfo as well as other bundle header data. In addition the globus_common-gcc32-pgm package is included in every bundle that is built with this template.
Run gpt-bundle -bn=newfee -bv=3.4 -bl=MEB-2.5b1 -bs=Beta -xml=template.xml globus_proxy_utils the resulting bundle will be named newfee-MEB-2.5b1-i686-pc-linux-gnu-bin.tar.gz.
Unpack this bundle and look at the bundle definition file named newfee-MEB-2.5b1.gpt-bundle.xml. It should look similar to this. As can be seen, elements such as the bundle version, the version label, and the version stability have been replaced by the command line inputs. Other elements contain the values of the template.
gpt-bundle by default will pull into a bundle the entire dependency tree of a package. This inclusion is keyed off of the package type of the package. The package type specifies the deployment environment which in turn dictates which dependencies are followed. This table shows how this works:
There are three different ways to control the inclusion of dependent packages. These can be specified both from the gpt-bundle command line and the bundle definition file. The following table summarizes these.
Table 6.3. Dependent Package Inclusion Control Commands
| gpt-bundle switch | Bundle Definition File Element | Description |
|---|---|---|
| -nodeps | PackageFlags NoDeps | Do not include any dependent packages. |
| -nosetups | PackageFlags NoSetups | Do not include any dependent setup packages. |
| -exclude=PACKAGE NAME | ExcludedPackages | Do not include package that matches PACKAGE NAME. |
The following shows some examples of how dependency inclusion can be controlled from the command line.
The following skips the setup packages globus_common_setup and globus_trusted_ca_42864e48_setup. Inside the bundle definition file the NoSetups flag is set.
bash$  gpt-bundle -bn=newfee -bv=3.4 -bl=MEB-2.5b1 -bs=Beta -nosetup -verbose -xml=template.xml globus_proxy_utils
Adding: globus_common-gcc32-pgm
Adding: globus_proxy_utils-gcc32-pgm
Adding Dep Pkg: globus_common-gcc32-rtl
Adding Dep Pkg: globus_gsi_callback-gcc32-rtl
Adding Dep Pkg: globus_gsi_cert_utils-gcc32-rtl
Adding Dep Pkg: globus_gsi_openssl_error-gcc32-rtl
Adding Dep Pkg: globus_openssl-gcc32-rtl
Adding Dep Pkg: globus_openssl_module-gcc32-rtl
Adding Dep Pkg: globus_gsi_proxy_ssl-gcc32-rtl
Adding Dep Pkg: globus_gsi_sysconfig-gcc32-rtl
Adding Dep Pkg: globus_gsi_credential-gcc32-rtl
Adding Dep Pkg: globus_gsi_proxy_core-gcc32-rtl
CREATING PACKAGES FOR globus_common-gcc32-pgm.....gpt..DONE
CREATING PACKAGES FOR globus_common-gcc32-rtl.....gpt..DONE
CREATING PACKAGES FOR globus_gsi_callback-gcc32-rtl.....gpt..DONE
CREATING PACKAGES FOR globus_gsi_cert_utils-gcc32-rtl.....gpt..DONE
CREATING PACKAGES FOR globus_gsi_credential-gcc32-rtl.....gpt..DONE
CREATING PACKAGES FOR globus_gsi_openssl_error-gcc32-rtl.....gpt..DONE
CREATING PACKAGES FOR globus_gsi_proxy_core-gcc32-rtl.....gpt..DONE
CREATING PACKAGES FOR globus_gsi_proxy_ssl-gcc32-rtl.....gpt..DONE
CREATING PACKAGES FOR globus_gsi_sysconfig-gcc32-rtl.....gpt..DONE
CREATING PACKAGES FOR globus_openssl-gcc32-rtl.....gpt..DONE
CREATING PACKAGES FOR globus_openssl_module-gcc32-rtl.....gpt..DONE
CREATING PACKAGES FOR globus_proxy_utils-gcc32-pgm.....gpt..DONE
Bundle written as /home/mbletzin/work/doc-bundles/newfee-MEB-2.5b1-i686-pc-linux-gnu-bin.tar.gz
The following skips all of the globus_common packages. Inside the bundle definition file globus_common is listed in the ExcludedPackages element.
bash$ gpt-bundle -bn=newfee -bv=3.4 -bl=MEB-2.5b1 -bs=Beta -x=globus_common -verbose -xml=template.xml globus_proxy_utils
Adding: globus_common-gcc32-pgm
Adding: globus_proxy_utils-gcc32-pgm
Adding Dep Pkg: globus_gsi_callback-gcc32-rtl
Adding Dep Pkg: globus_gsi_cert_utils-gcc32-rtl
Adding Dep Pkg: globus_gsi_openssl_error-gcc32-rtl
Adding Dep Pkg: globus_openssl-gcc32-rtl
Adding Dep Pkg: globus_openssl_module-gcc32-rtl
Adding Dep Pkg: globus_trusted_ca_42864e48_setup-noflavor-pgm
Adding Dep Pkg: globus_common_setup-noflavor-pgm
Adding Dep Pkg: globus_gsi_proxy_ssl-gcc32-rtl
Adding Dep Pkg: globus_gsi_sysconfig-gcc32-rtl
Adding Dep Pkg: globus_gsi_credential-gcc32-rtl
Adding Dep Pkg: globus_gsi_proxy_core-gcc32-rtl
CREATING PACKAGES FOR globus_common-gcc32-pgm.....gpt..DONE
CREATING PACKAGES FOR globus_common_setup-noflavor-pgm.....gpt..DONE
CREATING PACKAGES FOR globus_gsi_callback-gcc32-rtl.....gpt..DONE
CREATING PACKAGES FOR globus_gsi_cert_utils-gcc32-rtl.....gpt..DONE
CREATING PACKAGES FOR globus_gsi_credential-gcc32-rtl.....gpt..DONE
CREATING PACKAGES FOR globus_gsi_openssl_error-gcc32-rtl.....gpt..DONE
CREATING PACKAGES FOR globus_gsi_proxy_core-gcc32-rtl.....gpt..DONE
CREATING PACKAGES FOR globus_gsi_proxy_ssl-gcc32-rtl.....gpt..DONE
CREATING PACKAGES FOR globus_gsi_sysconfig-gcc32-rtl.....gpt..DONE
CREATING PACKAGES FOR globus_openssl-gcc32-rtl.....gpt..DONE
CREATING PACKAGES FOR globus_openssl_module-gcc32-rtl.....gpt..DONE
CREATING PACKAGES FOR globus_proxy_utils-gcc32-pgm.....gpt..DONE
CREATING PACKAGES FOR globus_trusted_ca_42864e48_setup-noflavor-pgm.....gpt..DONE
Bundle written as /home/mbletzin/work/doc-bundles/newfee-MEB-2.5b1-i686-pc-linux-gnu-bin.tar.gz
gpt-pkg can be used to create stand alone packages. It accepts a subset of the flags for gpt-bundle.
RPM binary bundles and packages can be created using the -native flag. The flags -rpmlicense and -rpmprefix can be used to insert alternate information in the rpm header of each package. The binary bundles are a collection of rpms that are wrapped in the same way that GPT packages are. Therefore they can be installed the same way the other binary bundles are. When the bundles are installed the information in the bundle definition file is not stored in the RPM database. The database will contain the information for each package in the bundle. GPT does not have any way to create source rpm's.
Table of Contents
Creating a package from software can be an intimidating experience. Under some circumstances it has to be because the goal of the packaging task is to automate the building, installing, and uninstalling of your software for users who have no interest in becoming familiar with compilers, build tools, or shell debugging; things that you can do in your sleep. The complexity of the task also has a lot to do with how much time has been spent designing the deployment aspect of your software. There are deployment issues such as binary relocatability, runtime configuration, dependencies, and platform portability that can make a packaging task a lot tougher if they are not handled properly in the software. In the next few chapters, we will illustrate packaging tasks from the very easy examples to some more complex ones in the later chapters. This chapter explains some important requirements that you need to consider when packaging software.
One of the main problems with installed binary packages is that there is no guarantee that the programs, libraries, and other package contents will wind up in the same absolute location as the one they were built and installed in. Large packaging organizations such as Redhat and SUSE can offer this guarantee because they ship entire operating systems. However computers involved in grids are independently administered which means that software locations are determined by the local administrator (or user for non-root installations).
A package is considered relocatable if there are no absolute paths that are embedded in the package contents and that are used by the software. Paths that are in text files can be modified during runtime by setup packages. Alternatively packages can use environmental variables to locate files.
All applications have a way to allow users to redefine the application's features. A good way to do this is with a configuration file that the application reads during runtime. Another popular method is to use the tool GNU autoconf to handle user configuration requests during the build process. This particular method however becomes a problem when a user installs binary packages. This type of installation does not have a build step and so the user has to accept whatever configuration the package builder has defined. One could possibly build a set of binary packages that encompass the range of user choices however this can quickly become unmanageble. A better solution is to build in all possible features at runtime and then design a runtime configuration method for the user.
Chances are, your software used libraries or executables from software developed by others. Unfortunately you cannot count on these being installed on end user machines unless they are part of a typical UNIX operating system. If this software hasn't already been packaged, you will need to package it or find some way to do without it. To make the situation worse, you also need to be aware of the version of the dependent software that is installed. There is no guarantee that every user will have the same version of the software installed. Because of this it is better to stick with older versions or bundle your software package with the specific versions that need to be deployed with it.
One of GPT's major strengths is that it allows packages to be built on any UNIX platform that has the appropriate GPT prerequisites installed. Once your software package becomes a part of a distribution of GPT packages, user expectations will include being able to build it on all sorts of UNIX platforms. GPT does not provide an answer for this itself but ti is compatible with tools such as GNU autoconf and GNU libtool which provide some portability support. The last packaging chapter will discuss how to use these tools.
Table of Contents
- Introduction
- GPT Scripts Used
- Perl Example: Hello World Script Package
- Perl Example: Hello World Perl Script Package With a Data File
- "C" Example : Hello World Program Package with a Makefile
- "C" Example : Hello World Program Package with Dependencies
- Testing the Example Packages
- Python Example: A Package Wrapper
This chapter starts of with packaging a simple perl script. It then adds a configuration file to illustrate relocation problems. The final example is a version of hello-world written in C which uses a shared library and a Makefile. All of the examples in the section assume that you have installed GPT and added $GPT_LOCATION/sbin and $GPT_INSTALL_LOCATION/bin to your path.
The following GPT scripts are used for creating a simple package:
- gpt-build
- Used to build the package.
- gpt-uninstall
- Used to remove package.
- gpt-query
- Used to search an installation for packaging data.
Here is a simple script that we will package first:
#! /usr/bin/env perl

print "Hello World\n";
There is nothing special about this program other than instead of calling perl directly it calls the program env. The problem with scripts in general is that they need to have the first line hard-coded with the full path of the interpreter which executes the script. This is not a problem with interpreters like the Bourne shell which is always found at /bin/sh. However for a program such as perl there are no such guarantees. The env program is another executable that is always located in the same directory. It can be used to find perl and then execute it with the rest of the file. This is thus a cheap way to achieve relocatability. What is not addressed by this env is finding the correct version of perl. For this you would need a hard-coded path that is set by a setup package.
To turn this into a package we need to do a couple of things. The first is to decide where the script should be located in a user installation. Like most executables we will want that to be $GPT_INSTALL_LOCATION/bin. Next we need to create a couple of files.
The first file is called filelist and it is always located in the top directory of a package. This contains the a listing of the installed files. NOTE that this is not a listing of files in the source directory but rather a listing of files in the installation. Since we only have one file our filelist will only have one entry:
bin/hello-world.pl
Filelists can also be generated and/or modified during the build process. A filelist file only need to be present when gpt-build is installing the packaging data after building the software.
The second file that needs to be created is the source packaging data file called pkg_data_src.gpt. This file also needs to be in the top source directory (it can also be in a subdirectory called pkgdata). This file contains the build instructions for the package as well as package definitions. These definitions are automatically transposed into the binary packages that result from the build.
The first section of the file contains the XML header as well as the name, version, and other identity data of the package. The Aging_Version element has three attributes that are discussed here. One thing further to notice is that we switched the hyphen in the hello-world script to an underline in the pacakge name. Hyphens are special characters with GPT and other package managers. They are often used to delimit fields in a filename. It is legal to use a hyphen in a package name but not wise[1].
<?xml version="1.0" encoding="UTF-8"?>
<!DOCTYPE gpt_package_metadata SYSTEM "package.dtd">

<gpt_package_metadata Name="hello_world" Format_Version="0.02">

    <Aging_Version Major="0" Minor="0" Age="0"/>
    <Description >Simple Packaging Example</Description>
    <Version_Stability Release="Experimental"/>
The other major section is the Build instructions shown below which instruct GPT how to install the script. As can be seen the build steps are standard bourne shell commands which need to be platform portable.[2]. The only thing special is INSTALLDIR_GPTMACRO which is a GPT build macro. A list of these macros are found here. This particular macro gets expanded into the user's installation location before the build step is executed.
    <Build_Instructions>

      <Build_Step>mkdir -p INSTALLDIR_GPTMACRO/bin</Build_Step>
      <Build_Step>cp hello-world.pl INSTALLDIR_GPTMACRO/bin</Build_Step>
      <Build_Step>chmod 755 INSTALLDIR_GPTMACRO/bin/hello-world.pl</Build_Step>

    </Build_Instructions>
The complete set of files for this package can be found here.
The directory containing these files can now be recognized as source by GPT. A gpt-build command will install the script and create a binary package entry in the installation:
bash$ cd examples/hello_world
bash$ gpt-build
gpt-build ====> CHECKING BUILD DEPENDENCIES FOR hello_world
gpt-build ====> Changing to /home/mbletzin/nmi/gpt-docs/examples/hello_world
gpt-build ====> BUILDING FLAVOR
gpt-build ====> Changing to /home/mbletzin/install/globus/etc
gpt-build ====> REMOVING empty package hello_world-noflavor-dev
gpt-build ====> REMOVING empty package hello_world-noflavor-rtl
Running hello-world.pl will now work. In addition, running gpt-query shows that hello_world-noflavor-pgm pkg version: 0.0.0 is now a part of the installation. GPT has figured out for you that no build flavors have been used and that the script belongs in a pgm package.
This next example has hello-world.pl reading a data file. The main problem here is that because of relocatability, the script cannot know where the data file is located. To solve this the script reads the environmental variable $GPT_INSTALL_LOCATION[3] to find the file. The new script looks like this:
#! /usr/bin/env perl

print "Hello World\n";

# Get the value of the $GPT_INSTALL_LOCATION variable
my $installdir= $ENV{'GPT_INSTALL_LOCATION'};

die "Need to set \$GPT_INSTALL_LOCATION\n" if ! defined $installdir;

open CFG, "$installdir/etc/hello_world.data";

my @contents =  <CFG> ;

print @contents;
The filelist needs to list the new data file which we will install in $GPT_INSTALL_LOCATION/etc. The packaging data file also needs to change. In this file, the first thing to do is to increment the minor version number. We do this because we want to make sure that when the package is built or installed, it will replace the package from the previous example.
Incrementing Major and Minor version numbers is a judgement call. The rule of the thumb is that the Major number is incremented if the runtime interface changes. In this case, the run time interface is the command line invocation of the script. If we add command switches to the script, change its name, or add another script then the Major number should be incremented[4]. The new header looks like this:
<gpt_package_metadata Name="hello_world" Format_Version="0.02">

    <Aging_Version Major="0" Minor="1" Age="0"/>
    <Description >Simple Packaging Example</Description>
    <Version_Stability Release="Experimental"/>
Running gpt-build on these new changes produces the following:
bash$ gpt-build
gpt-build ====> CHECKING BUILD DEPENDENCIES FOR hello_world
gpt-build ====> Changing to /home/mbletzin/nmi/gpt-docs/examples/hello_world2
gpt-build ====> BUILDING FLAVOR
gpt-build ====> Changing to /home/mbletzin/install/globus/etc
gpt-build ====> REMOVING empty package hello_world-noflavor-dev
WARNING: "/home/mbletzin/install/globus/etc/hello_world.data" not found
gpt-build ====> REMOVING empty package hello_world-noflavor-rtl
This shows that we forgot to add an installation command for the data file. GPT will produce warnings for any files listed in the filelist that are missing from the installation. When the packaged is archived, these missing files produce errors because native package managers cannot handle missing files[5].
Here are the fixed build instructions:
    <Build_Instructions>

      <Build_Step>mkdir -p INSTALLDIR_GPTMACRO/bin</Build_Step>
      <Build_Step>cp hello-world.pl INSTALLDIR_GPTMACRO/bin</Build_Step>
      <Build_Step>mkdir -p INSTALLDIR_GPTMACRO/etc</Build_Step>
      <Build_Step>cp hello_world.data INSTALLDIR_GPTMACRO/etc</Build_Step>
      <Build_Step>chmod 755 INSTALLDIR_GPTMACRO/bin/hello-world.pl</Build_Step>

    </Build_Instructions>
The complete set of files for this package can be found here.
This example is a hello package written in C that has a shared library and a makefile. The makefile simplifies the build instructions because it takes care of installing the files. However, the makefile will still need to get location information from GPT in order to install the files correctly. The normal way to do this is by passing in shell variables when make is invoked.
Here is the makefile. It includes the normal makefile targets for building and installing C code:
INSTALL_LOCATION=/usr/local

.c.o :
	cc -I . -c $<

all: hello-world-c

hello-world-c: hello-world.o libhello_world.so
	cc -o $@ hello-world.o -L. -lhello_world

libhello_world.so: libhello_world.c libhello_world.h
	cc -o $@ -shared libhello_world.c

install: hello-world-install

hello-world-install:
	mkdir -p $(INSTALL_LOCATION)/bin
	cp hello-world-c $(INSTALL_LOCATION)/bin
	chmod 755 $(INSTALL_LOCATION)/bin/hello-world-c
	mkdir -p $(INSTALL_LOCATION)/lib
	cp libhello_world.so $(INSTALL_LOCATION)/lib
	mkdir -p $(INSTALL_LOCATION)/include
	cp libhello_world.h $(INSTALL_LOCATION)/include

clean:
	rm -f *.o hello-world-c libhello_world.so
The installation location is stored in the shell variable $INSTALL_LOCATION. The variable is set via a GPT macro with the following build instructions:
    <Build_Instructions>

      <Build_Step>make INSTALL_LOCATION=INSTALLDIR_GPTMACRO</Build_Step>
      <Build_Step>make install INSTALL_LOCATION=INSTALLDIR_GPTMACRO</Build_Step>

    </Build_Instructions>
The complete set of files for this package can be found here.
This example adds dependencies to a package. Dependencies are useful in determining the completeness of installations. Users can be spared obscure errors by doing a dependency check after installing the package[6]. Dependencies can be determined from the source code and the makefile.
Here is the relevent Makefile section
guten-tag-welt: guten-tag-welt.o
        cc -o $@ guten-tag-welt.o -L$(INSTALL_LOCATION)/lib -lhello_world
This shows that the program needs to be linked with the libhello_world.so library from the previous example package. Since this is a shared library, the dependency exists both during package building and runtime. The dependency is expressed as follows
    <Source_Dependencies Type="pgm_link" >
      <Dependency Name="hello_world_c" Package="pgm">
        <Version>
          <Simple_Version Major="0">
          </Simple_Version>
        </Version>
      </Dependency>
    </Source_Dependencies>
The dependency type is 'pgm_link' because we are linking against a program. If we had a guten_tag library that we were linking against, the dependency type would be 'lib_link'. The reason for the type difference is that lib_link dependencies are used by GPT to assemble dependency trees that are then converted into link lines for building programs. pgm_link dependencies should are not used for this. The hello_world_c package which contains the needed library is a 'pgm' package type when built, which indicates the setting for the Package attribute.
The source code reveals two more dependencies. The first is the include statement shown here:
#include "libhello_world.h"
This is a compile dependency to the hello_world_c package. Although this dependency may seem redundant with the linking dependency discussed earlier, it is still a good idea to express it because GPT will check different types of dependencies at different times[7]. The compile dependency is expressed as follows:
    <Source_Dependencies Type="compile" >
      <Dependency Name="hello_world_c" Package="pgm">
       <Version>
        <Simple_Version Major="0">
        </Simple_Version>
       </Version>
      </Dependency>
    </Source_Dependencies>
The last dependency is revealed in the source code with the system command:
system("$GPT_INSTALL_LOCATION/bin/hello-world.pl");
This shows that the script is executing the hello-world.pl script from the first two example packages. The dependency is a runtime dependency type and is expressed as follows:
    <Source_Dependencies Type="pgm_runtime" >
      <Dependency Name="hello_world" Package="pgm">
       <Version>
        <Simple_Version Major="0">
        </Simple_Version>
       </Version>
      </Dependency>
    </Source_Dependencies>
One thing to note is that because we chose the Simple_Version compatiblity element, the dependency can be fulfilled by either of the first two example packages depending on which one is installed.
The complete set of files for this package can be found here.
We will now test the previous examples. Testing packages involves building them, putting them in a binary bundle, installing the bundle in an empty location, and then run a quick test on the executables. With this example the testing is easier because the guten_tag_welt package uses the contents of the other packages. You can try this out by downloading a tarfile that contains all of the source for the example packages.
The first thing to do is to build all of the packages. This can be done by one gpt-build command. See this section for information on how to use gpt-build:
bash$ gpt-build -srcdir=hello_world2/ -srcdir=hello_world_c1/ -srcdir=guten_tag_welt/
gpt-build ====> CHECKING BUILD DEPENDENCIES FOR hello_world
gpt-build ====> Changing to /home/mbletzin/nmi/gpt-docs/examples/hello_world2/
gpt-build ====> BUILDING FLAVOR
gpt-build ====> Changing to /home/mbletzin/install/globus/etc
gpt-build ====> REMOVING empty package hello_world-noflavor-dev
gpt-build ====> REMOVING empty package hello_world-noflavor-rtl
gpt-build ====> CHECKING BUILD DEPENDENCIES FOR hello_world_c
gpt-build ====> Changing to /home/mbletzin/nmi/gpt-docs/examples/hello_world_c1/gpt-build ====> BUILDING FLAVOR
gpt-build ====> Changing to /home/mbletzin/install/globus/etc
gpt-build ====> REMOVING empty package hello_world_c-noflavor-dev
gpt-build ====> REMOVING empty package hello_world_c-noflavor-rtl
gpt-build ====> CHECKING BUILD DEPENDENCIES FOR guten_tag_welt
gpt-build ====> Changing to /home/mbletzin/nmi/gpt-docs/examples/guten_tag_welt/gpt-build ====> BUILDING FLAVOR
gpt-build ====> Changing to /home/mbletzin/install/globus/etc
gpt-build ====> REMOVING empty package guten_tag_welt-noflavor-dev
gpt-build ====> REMOVING empty package guten_tag_welt-noflavor-rtl
Next we create a bundle out of all of the packages. For this we can specify the top level guten_tag_welt package. gpt-bundle will pull in all of the dependent packages. The command is as follows (This section has more information on gpt-bundle.)
bash$ gpt-bundle -bn=gpt-examples -bv=0.1 guten_tag_welt
Bundle written as /home/mbletzin/nmi/gpt-docs/examples/gpt-examples-0.1-i686-pc-linux-gnu-bin.tar.gz
bash$ tar tzvf gpt-examples-0.1-i686-pc-linux-gnu-bin.tar.gz
-rw-r--r-- mbletzin/mbletzin 1092 2003-05-17 20:25:56 gpt-examples_bundle-0.1.gpt-bundle.xml
-rw-r--r-- mbletzin/mbletzin 5892 2003-05-17 20:25:56 guten_tag_welt-0.0-i686-pc-linux-gnu-noflavor-pgm.tar.gz
-rw-r--r-- mbletzin/mbletzin  771 2003-05-17 20:25:56 hello_world-0.1-i686-pc-linux-gnu-noflavor-pgm.tar.gz
-rw-r--r-- mbletzin/mbletzin 7153 2003-05-17 20:25:56 hello_world_c-0.0-i686-pc-linux-gnu-noflavor-pgm.tar.gz
-rw-r--r-- mbletzin/mbletzin  167 2003-05-17 20:25:56 packagelist
This bundle is now installed in an empty location and tested to make sure that the packages are complete:
bash$ gpt-install gpt-examples-0.1-i686-pc-linux-gnu-bin.tar.gz
Bundle gpt-examples successfully installed.
Cleaning up temp locations
bash$ $GPT_INSTALL_LOCATION/bin/guten-tag-welt
Guten Tag Welt
Hello World
I am a hello world configuration file.
Hello from the hello world library
The bundle looks ready to ship :)
There are occasions where you cannot add GPT files to source code that needs to be packages. To solve this it possible to wrap a GPT package around the software. As an example of this, we have a python module called ola_mundo version 0.1 which needs to be wrapped. As shown in the following directory listing, the top level directory of a package wrapper consists of the GPT files plus the source distribution as a subdirectory:
drwxr-xr-x    2 mbletzin mbletzin     4.0k May 16 12:01 CVS
-rw-r--r--    1 mbletzin mbletzin      106 May 16 11:33 filelist
drwxr-xr-x    5 mbletzin mbletzin     4.0k May 16 12:01 ola_mundo-0.1
-rw-r--r--    1 mbletzin mbletzin      530 May 16 11:38 pkg_data_src.gpt
All of the files can be seen here. The filelist has the same content as it would for a normal package. The package data file has a new attribute in the Build_Instructions element called SrcDir which points to the source distribution:
    <src_pkg>

    <Version_Label>0.1</Version_Label>

    <Build_Instructions SrcDir="ola_mundo-0.1">

      <Build_Step>python setup.py install --prefix=INSTALLDIR_GPTMACRO</Build_Step>

    </Build_Instructions>

    </src_pkg>
A Version_Label element has also been added to the packaging data. This allows the version of the source to be displayed to the user even though it does not follow the GPT package version scheme. When the source is updated the version number, version label, and source directory needs to be edited also.
Running gpt-build and then gpt-query in this directory shows how the package is built in the source subdirectory and how the package and software versions are displayed to the user.
bash$ gpt-build
gpt-build ====> CHECKING BUILD DEPENDENCIES FOR ola_mando
gpt-build ====> Changing to /home/mbletzin/nmi/gpt-docs/examples/ola_mundo_pnb/ola_mundo-0.1
gpt-build ====> BUILDING FLAVOR
gpt-build ====> Changing to /home/mbletzin/install/globus/etc
gpt-build ====> REMOVING empty package ola_mando-noflavor-dev
gpt-build ====> REMOVING empty package ola_mando-noflavor-rtl
bash$ gpt-query
4 packages were found in /home/mbletzin/install/globus that matched your query:

packages found that matched your query
	guten_tag_welt-noflavor-pgm pkg version: 0.0.0
	hello_world-noflavor-pgm pkg version: 0.1.0
	hello_world_c-noflavor-pgm pkg version: 0.0.0
	ola_mando-noflavor-pgm pkg version: 0.0.0 software version: 0.1
As with all of the other examples, this python example was used to demonstrate the language independence of GPT. However to keep things simple, we have not spend a lot of time on python portability issues. For example, as can be seen from the filelist, the python modules are installed in a versioned python directory. How this works if the end user installs this package on a platform with python version 1.6 is left as an exercise :).
[1] The Globus Toolkit™ had a coding convention where executable name delimiter was the hyphen and the delimiter for every other file was the underline character. This convention has been used in this book because the author is too old to change :).
[2] In this case the commands are semi-portable because the mkdir -p does not work on some older UNIX systems.
[3] Any variable will do but this one is already set.
[4] When the Major number changes then the Age also may need to be adjusted to indicate backwards compatibility. Of the three interface changes mentioned, The script addition is backwards compatible, the name change is not, and the command switch addition can be if the default invocation has not changed. If the change is backwards compatible then the Age is also incremented.
[5] On a related issue GPT has no way of checking if a file is missing from the filelist and so it is always a good idea to test an installation created from binary packages to make sure nothing is missing.
[6] More importantly, you can be spared attempting to debug obscure deployment errors in support of end users.
[7] If the package is linking against a library that is always deployed statically then only a compile dependency needs to be expressed. However if the library is deployed as shared or both then both compile and linking dependencies should be expressed to cover both build and runtime deployment.
Table of Contents
A common problem with packages comes about from the fact that frequently the contents of the package needs to be "localized". Configuration files and scripts need to be modified after the package is deployed to taylor the package to the system it is deployed on. The problem is that these modifications are erased every time a package is upgraded. There are many solutions to this. What GPT does is allow the configuration files and scripts to be put into a special package called a "Setup Package". GPT then enables the relationship between this package and the original package to be expressed with a Setup Dependency.
One of the main differences between setup packages and normal packages is that setup packages actually have two sets of names and versions. The first name/version uniquely identifies the package. The second name/version is used to match the package with a setup dependency. This allows multiple different setup packages to fulfill the same setup dependency. A real world example of this is for a site such as a university to designate a specific configuration for its systems. This configuration could be implemented by a set of setup packages that would replace the set that came with the software.
A setup package is a normal package plus some extra elements
- Setup Name
Name used to match a setup dependency.
- Setup Version
Aging_Version element used to match a setup dependency.
- Post Install Message
Message that is supposed to be displayed to during post install. Not currently implemented.
- Post Install Program
Name of the program that needs to be executed by gpt-postinstall.
- Post Install Message
Message that is supposed to be displayed to during post install. Not currently implemented.
The setup version of a package only needs to be updated when the format of the configuration files read by the application change. The normal version of the package needs to be updated every time the contents of the package have been changed.
This chapter ahs focused mainly on the implementation of setup packages. There is a whole lot of additional issues and concepts associated with this area. The application GridConfig provides a flexible configuration solution that is compatible to setup packages. Deep setup package theory is discussed in this paper
Table of Contents
This chapter describes some concepts that need to be understood in order to successfully package software with GPT. The concepts are common for most package managers although GPT imposes more stringent rules
GPT imposes a version numbering convention on packages and bundles so that the updating and compatiblity checking functions works as expected. These version numbers are used internally by GPT and do not have to match the version number of the software being packaged or bundled. GPT also provides a Version_Label field for packages and bundles that can contain the version number of the software as a CDATA string. This field is displayed to the user when queries are done.
GPT has adopted a variation of libtool's version numbering scheme for packages and bundles. In libtool's scheme, each version number consists of three fields, major version number, minor version number, and a "compatibility range" number. The major version number is bumped for any interface change, the minor version represents gets bumped for bugfixes, etc in a given interface, and the third number represents the range for which the first number is backwardly compatible. For example, 5.4.3 is backwardly compatible with 2.x.x and up (through 5), since 5-3=2.
The element that contains the version number for the packages and bundles is the Aging_Version element. The Major attribute contains the major number. The Minor attribute contains the minor number. The Age attribute contains the backawards compatibility number.
GPT provides a couple of elements to express version compatibility as a part of a package dependency. The two elements are Simple_Version and Version_Range. Multiple instances of these two elements can be used to create a list of compatibility expressions inside a Version element. The Simple_Version element computes compatibility with the Major, Minor, and Age attributes of an Aging_Version element. The Version_Range uses only the Major and Minor Aging_Version attributes to compute compatibility. It ignores the Age attribute. How this works is best expressed by a number of examples in the following table
Table 10.1. Version Compatibility Examples
| Compatiblity Requirement | Package Version | Is Compatible | Notes | ||
|---|---|---|---|---|---|
| Math Expression | XML Equivelent | Math Expression | XML Equivelent | ||
| 2.2 | <Simple_Version Major="2"> | 2.3.0 | <Aging_Version Major="2" Minor="3" Age="0"> | Yes | Only the Major version number is used to check compatibility. |
| 2 | <Simple_Version Major="2"> | 3.2.0 | <Aging_Version Major="3" Minor="2" Age="0"> | No | Major version number minus Age is not less than or equal 2. |
| 2 | <Simple_Version Major="2"> | 3.2.1 | <Aging_Version Major="3" Minor="2" Age="1"> | Yes | Major version number minus Age is equal to 2. |
| 3.1 exactly | <Version_Range Upper_Major="3" Lower_Major="1" Upper_Minor="3" Lower_Minor="1"> | 3.2.0 | <Aging_Version Major="3" Minor="2" Age="0"> | No | Minor version does not fall within the range. |
| 3.1 to 3.3 | <Version_Range Upper_Major="3" Lower_Major="1" Upper_Minor="3" Lower_Minor="3"> | 3.2.0 | <Aging_Version Major="3" Minor="2" Age="0"> | Yes | Both versions does fall within the range. |
| 2.1 to 3.9 | <Version_Range Upper_Major="2" Lower_Major="1" Upper_Minor="3" Lower_Minor="9"> | 3.2.0 | <Aging_Version Major="3" Minor="2" Age="0"> | Yes | Both versions does fall within the range. |
| 2.1 to 3.9 | <Version_Range Upper_Major="2" Lower_Major="1" Upper_Minor="3" Lower_Minor="9"> | 4.2.2 | <Aging_Version Major="4" Minor="2" Age="2"> | No | Major version does not fall within the range. Note that the Age is not used to compute compatability for range elements. |
| 2 or 3.5 to 4.2 | <Simple_Version Major="2"> <Version_Range Upper_Major="3" Lower_Major="5" Upper_Minor="4" Lower_Minor="2"> | 3.2.0 | <Aging_Version Major="3" Minor="2" Age="0"> | No | Major minus Age is not within 2. Versions are not within the range |
| 2 or 3.5 to 4.2 | <Simple_Version Major="2"> <Version_Range Upper_Major="3" Lower_Major="5" Upper_Minor="4" Lower_Minor="2"> | 3.2.1 | <Aging_Version Major="3" Minor="2" Age="1"> | Yes | Major minus Age is within 2. |
| 2 or 3.5 to 4.2 | <Simple_Version Major="2"> <Version_Range Upper_Major="3" Lower_Major="5" Upper_Minor="4" Lower_Minor="2"> | 3.9.0 | <Aging_Version Major="3" Minor="9" Age="0"> | Yes | Versions are within the range |
Versions are included in the filenames of however packages and bundles. However, they have different ways of choosing what to use as a filename version number. Bundles will use the contents of the Version_Label if it exists. Otherwise the bundle version is used in the form Major.Minor. Packages always use the Aging_Version element for the filename version. This is because GPT needs to be able to extract the version number from an rpm file because it cannot extract packaging information from the contents of this type of file.
Package dependencies are a convenient way to provide a way for the end user to check his/her deployment without having to deal with extensive system tests and/or obscure runtime errors. However encoding these depedencies requires some forethought. To aid with this GPT comes with a set of typed dependencies. These dependency types make it easier for developers to define package relationships. The dependencies are detailed as part of the source code of the package. GPT automatically translates these dependencies and transfers them to the resulting binary packages. The types are as follows
Table 10.2. Source Dependency Types
| Dependency Type | XML Element or Attribute | Description |
|---|---|---|
| Compile | compile | This is when the package requires a header, precompile definitions or other compilation information from another package. |
| Library Link | lib_link | This is when a package contains a library that has libraries from another package that it depends on. Only direct dependencies are needed since GPT builds the entire dependency tree when doing its check. |
| Program Link | pgm_link | This is when a package contains a program that links with libraries from another package. Only direct dependencies are needed since GPT builds the entire dependency tree when doing its check. |
| Runtime | data_runtime, doc_runtime, pgm_runtime, or lib_runtime | Package needs something from another package in order to work in a runtime environment. The dependency needs to be expressed as a binary to binary package dependency. Can be anything from an executable to a hyperlinked document. Library dependencies should not be included here since they are already handled by dependency types mentioned above. |
| Setup | Source_Setup_Dependency | This is when a package needs configuration files or scripts from another package. This dependency is used to seperate applications from configuration data so that these don't have to be re-configured every time the application packages are upgraded. |
GPT manages these dependencies by setting up various deployment environments such as Build and Runtime to determine which dependencies should be checked. The following sections provide more detail into these environments and the dependencies they honor.
A typical GPT dependency has three common components. Setup and Runtime dependencies have two additional components. The components are as follows:
- Dependency Type
This component dictates to GPT what deployment environment is valid for the dependency and also determines some rules when the dependency is converted from source to binary.
- Package Name
This is the name of the dependent package. It is used by all of the dependency types except setup.
- Version Requirements
This expresses the version compatiblity requirements of the dependent package. This is used by all of the dependency types.
- Binary Package Type
This allows the dependency to be more specific about a dependent package by specifying the package type. This component is only used by runtime and setup dependencies. The other dependency types have standard package types that are automatically encoded by GPT.
- Setup Package Name
This is an alternative name used by setup dependencies.
The build dependencies are in affect when packages are being used to compile and link other software. This situation does not only occur during package building. Many packages are software development kits that allow end users to build software using packages. In this situation build dependencies are also applicable.
The compile dependency and the two linking dependencies make up the build dependency set. These dependencies are checked when building the package using gpt-build. They are also also transferred to the binary packages packages that are create from this package. The transfer is described by the following tables. This table shows how the dependency types are converted. This table shows what package types the binary dependencies are pointing and transferred to. Regeneration dependencies currently do not show up in any binary packages.
Table 10.3. Build Dependency Types
| Source Build Dependency Type | Resulting Binary Dependency Type | |
|---|---|---|
| With Dynamic Linking | With Static Linking | |
| compile | Compile | Compile |
| lib_link | Runtime_Link and Build_Link | Regeneration and Build_Link |
| pgm_link | Runtime_Link and Build_Link | Regeneration and Build_Link |
Table 10.4. Binary Dependency Types and Their Package Types
| Binary Dependency Type | Binary Package Type That Gets The Dependency | Binary Package Type Which The Dependency Points To | ||
|---|---|---|---|---|
| With Dynamic Linking | With Static Linking | With Dynamic Linking | With Static Linking | |
| Compile | dev | dev | dev | dev |
| Build_Link | dev | dev | dev | dev |
| Runtime_Link for Libraries | rtl | NONE | rtl | NONE |
| Runtime_Link for Programs | pgm | NONE | rtl | NONE |
Runtime dependencies are also expressed as source dependencies but in reality the dependencies are relationships between specific binary packages. For this reason the dependency has two pkgtype components as well as the package name and version requirements. The first package type specification is embedded in the dependency type. This package type indicates which to binary package the dependency is transfered to. The second package type further specifies the dependent package.
Setup dependencies are used to to relate software packages to their dependent setup packages. This is a one-to-many relationship in that GPT allows for the possiblity to have multiple setup packages fulfill the same setup dependency. A setup dependency use the Setup_Name and Setup_Version to identify the dependent package rather than Package_Name and Version. Different setup packages (each with a different Package_Name and Version) can have the same Setup_Name and Version
Here are some examples that show how GPT dependencies are implemented
Table 10.5. Dependency Examples
| Dependency Description | Dependency Components | XML Expression |
|---|---|---|
| Package FOO uses headers from package FEE version 3 |
|
<Source_Dependencies Type="compile" >
    <Dependency Name="FEE" >
        <Version >
            <Simple_Version Major="3" />
        </Version>
    </Dependency>
</Source_Dependencies>
|
| A library in package FOO depends on symbols from a library in package FEE version 3 |
|
<Source_Dependencies Type="lib_link" >
    <Dependency Name="FEE" >
        <Version >
            <Simple_Version Major="3" />
        </Version>
    </Dependency>
</Source_Dependencies>
|
| Library in package FOO executes scripts from package FEE version 3 |
|
<Source_Dependencies Type="lib_runtime" >
    <Dependency Name="FEE" Package="pgm">
        <Version >
            <Simple_Version Major="3" />
        </Version>
    </Dependency>
</Source_Dependencies>
|
| Documents in package FOO hyperlink to documents in package FEE version 3 |
|
<Source_Dependencies Type="doc_runtime" >
    <Dependency Name="FEE" Package="doc">
        <Version >
            <Simple_Version Major="3" />
        </Version>
    </Dependency>
</Source_Dependencies>
|
| Programs in package FOO read configuration files created by setup package with a setup name and version FOO_Setup version 3 |
|
<Source_Setup_Dependency PkgType="pgm">
   <Setup_Dependency Name="FOO_Setup">
       <Version>
            <Simple_Version Major="3"/>
       </Version>
   </Setup_Dependency>
</Source_Setup_Dependency>
|
Table of Contents
The GPT buildtools are built on top of the standard GPT installation. The purpose of these tools is to aid developers and builders with managing their work environment thereby simplifying their efforts. The build tools can be used to create source and binary packages and bundles and to create dependency listings from given pkgs.
The build tools help to verify, troubleshoot and perform production builds for GPT packages from the rawest source tree from to the bundled deliverables. But it is important to understand that the buildtools do not create GPT packages from source trees without the GPT packaging data files present in each source directory. The build tools can not perform the creation of the data files, the developer must create these as defined in "A User Guide to the Grid Packaging Tools" and these files must be available within the source tree prior to running the build tools.
Usage: uberBuild -listpkgs [ -setupname ] [ -srcdir ]
       uberBuild -listdeps [ -deptype ] [ -srcdir ] [ -pkgdir ]
                           [ -pkgconf [ variable substitutions ] ] pkg
       uberBuild -genpkgconf -srcdir
       uberBuild -srcpkg [ -compiler ] [ -srcdir ] [-pkgdir ] [ -fast ]
                         [ -pkgconf [ variable substitutions ] ] pkgs
       uberBuild -binpkg [ -flavor ] [ -srcdir ] [-pkgdir ] [ -fast ]
                         [ - compiler ] [ -pkgconf [ variable substitutions ] ]
                         [ package names ] [ src packages ]
       uberBuild -buildpkg [ -compiler ] [ -srcdir ] [-pkgdir ] [ -fast ]
                           [ -flavor ] [ -pkgconf [ variable substitutions ] ]
                           [ package names ] [ src packages ]
       uberBuild -createbundle [ -src | -flavor ] [ -bundleversion ]
                               [ -bundlelabel ] [ -compiler ]
                               [ -pkgconf [variable substitutions] ]
                               [ bundle defitions ]
       -verbose and -debug can be added to any combination.
Options:
    -listpkgs    List pkgs with src available in -srcdir
    -setupname=s Used with -listpkgs, list pkgs with given setup name
    -srcdir=s    Directory containing raw sources
    -pkgconf=s   Package configuration file
    -genpkgconf  Write internal pkg config to STDOUT
    -srcpkg      Create the given source package(s) from srcdir
    -compiler=s  compiler to use (gcc32, gcc64, vendorcc32, etc)
    -pkgdir=s    directory with GPT packages and bundles
    -fast        Optimize when possible, skip redundant steps
    -flavor=s    Flavor to build with (pthr, dbg, etc)
    -debug       Print debugging statements
    -verbose     Print verbose output
    -bundleversion=s version of newly created bundle
    -versionlabel=s  Label to use on newly created bundle


    variable subsitutions follow the for var=val where any pattern matching
    var in -pkgconf will be substituted with val.
The buildtool can be used to list available packages in a given source tree.
> uberBuild -listpkgs -srcdir=/sandbox
nwslapd_setup
nws-client
nws-server
kca_setup
kx509
myproxy
The listing can be narrowed down to packages with a specific setup name. Note that the setup name can be different from the package name.
> uberBuild -listpkgs -setupname=trusted_ca_setup
globus_trusted_ca_42864e48_setup
The GPT build tools can aid in determining packaging dependencies for build, installing and troubleshooting. The tools can generate three dependency types, install, build and none. 'install' will list all packages necessary for a successful install of the given package. Note that this list does not include setup package dependencies. This is due to the nature of setup dependencies, the package name cannot be inferred from the setup dependency name. The 'build' dependency type will list all packages necessary to build the given package in build dependent order. The 'none' dependency implies that -deptype is not specified in which case only the dependencies explicitly listed in the package's data file are printed.
The listings can be generated from any combination of the given source tree (-srcdir) and the given package directory (-pkgdir). The source tree is tried first, if the given package is not found, the available packages are searched followed by the available bundles.
> uberBuild -listdeps -srcdir=/sandbox globus_gsi_proxy_core
globus_gsi_proxy_ssl
globus_gsi_openssl_error
globus_openssl
globus_common
globus_gsi_credential
globus_gsi_sysconfig
globus_gsi_cert_utils
globus_openssl_module

> uberBuild -listdeps -deptype=build -srcdir=/sandbox globus_gsi_proxy_core
globus_common
globus_openssl
globus_openssl_module
globus_gsi_openssl_error
globus_gsi_cert_utils
globus_gsi_sysconfig
globus_gsi_proxy_ssl
globus_gsi_callback
globus_gsi_credential
Most builds are straightforward, however, some builds have special requirements to preform. Because of this fact, the package configuration file was created (-pkgconf). In addition, this option saves time since without it, the build tools must search the given source directory for package locations.
The package configuration file has a simple format. Comments start with '#' and must be the first item on the line with the exception that there can be leading white space. Each section is started by the name of a package, without leading whitespace, and ended by either the start of the next section or end of file. Each line in a section is a key/value pair, with the key having some amount of whitespace before it and some amount of white space between the key and value. If the key does not have a value for the package, the key should not be used. Each section has the following format:
package_name
	srcdir value
	setupname value
	srcbootstrap value
	binbootstrap value
	buildflags value
The value for srcdir is the location of the source directory. setupname specifies that package satisfies a specific setup dependency by the given name. srcbootstrap is an action to preform on the source before creating a source package. An example of srcbootstrap is applying patches to the source before the package is created. binbootstrap is an action to preform one the source prior to building the package into binary. As an example, the package may require installing a virtual package before this package can be built. The commands to initiate the virtual package installation can be specified in binbootstrap. buildflags specifies arguments to pass to gpt-build when building sources.
globus_gsi_proxy_ssl
    srcdir /sandbox/gsi/proxy/proxy_ssl/source
globus_trusted_ca_42864e48_setup
    setupname trusted_ca_setup
    srcdir /sandbox/gsi/trusted_ca/setup
gsi_openssh
    # src pkg from ftp
    buildflags GSI_OPENSSH_GPTMACRO="--with-tcp-wrappers --with-pam"
gsi_openssh_setup
    setupname gsi_openssh_setup
    # src pkg from ftp
Variables can be used in the package configuration file's values to allow for dynamic runtime decisions. These variables are substituted given the values on the commandline. Variables can not be used in the section header (package_name) or in the keys. Variables can follow any format the author likes, the pattern of the variable is specified on the command line.
> uberBuild -listdeps globus_common -pkgconf=/sandbox/pkgconf %SRCDIR%=/sandbox
One special case variable exists, %FLAVOR%, used only in the values for binbootstrap and srcbootstrap. This variable is unique in that it is not specified from the commandline, instead, the build tools determine its value as the flavor of the current building package.
The following are examples taken from a package configuration file used in testing.
myproxy
    srcdir %SRCDIR%/myproxy
kx509
    srcdir %SRCDIR%/pkgs/kx509/src
    binbootstrap gpt-virtual-pkg -flavor=%FLAVOR% -filelist=krb5filelist  -gptfile=krb5gptpkgdata -prefix=/usr/local/krb5
kca_setup
    setupname kca_setup
    srcdir %SRCDIR%/pkgs/kca_setup
nws-client
    srcdir %SRCDIR%/nws
    srcbootstrap rm -f pkg_data_src.gpt pkg_data_src.gpt.server filelist.in.server filelist.in ;mv pkg_data_src.gpt.client pkg_data_src.gpt ; ln -s filelist.in.client filelist.in
The package configuration file can be initially created by the GPT build tools to save time and effort. The -genpkgconf option will search the given source directory for GPT package data files. The build tools will get the name, setup name and source directory for each available package. The results are then sent to standard out which can be redirected to a file for use in future calls to the build tools. Note that this option can not produce srcbootstrap, binbootstrap or buildflags keys/values nor can the build tools determine the variables that the developer wishes to use, these must be added manually with an editor.
> uberBuild -genpkgconf -srcdir=/sandbox > pkgconf
The package configuration file is not needed for most tasks. It is required when:
there are special bootstrapping instructions
performance related to searching the source directory for available packages becomes an issue
the building of a package requires certain flags to gpt-build
The -srcpkg option is used to instruct the GPT build tools to create source packages from a source tree. The following usage applies:
uberBuild -srcpkg [ -compiler ] [ -srcdir ] [-pkgdir ] [ -fast ]
                  [ -pkgconf [ variable substitutions ] ] pkgs

          -compiler=s Specifies the compiler (s) to use for bootstrapping
          -srcdir=s   Directory (s) containing raw sources
          -pkgconf=s  Package configuration file (s)
          -pkgdir=s   Directory (s) with GPT packages and bundles
          -fast       Optimize when possible, skip redundant steps
          pkgs        Names of packages to create, as defined in the
                      packages GPT meta data file
The -compiler option specifies which compiler to use for the bootstrapping sequence. Not all GPT source packages require bootstrapping, however it is the default behavior for the GPT build tools. When raw sources are bootstrapped using the default bootstrap sequence, the sources are configured using autoconf and the resulting configure script is run specifying the given compiler. This allows the source directory to be configured as if it was prepared to be built into binary form. With the makefiles available, the build tools can issue make commands for known targets to further prepare the source directory for packaging. Although the -compiler option is not used for compilation in this step, it should be given with the system's compiler to gaurantee a successful configuration. The default for this option is gcc32.
The -srcdir option specifies where to find raw sources. This option is not needed when -pkgconf is used and the package configuration file was previously generated from this source directory. The -srcdir option requires more processing because it must search the source tree for available packages.
The -pkgconf option specifies a package configuration file previous generated from the given source directory. This option is a substitute for -srcdir which increases performance since the source tree does not have to be searched each time the tools are created. It also increases flexibility since the package configuration file can contain bootstrapping information and buildflags information that can not be determined from the source directory alone.
The -pkgdir option specifies the directory containing source and binary packages and bundles. This directory is used to store newly created source and binary packages and bundles as well. This option defaults to the current working directory.
The -fast option tells the GPT build tools to optimize when possible. The optimizations for source package creation mean that the build tools will not rebuild the source package if a source package by the same name is available in -pkgdir. The build tools will first search for available source packages and if none are found, it will search the source bundles. If a matching source package is found within a source bundle within -pkgdir, that source package is extracted into -pkgdir and the build tools proceed to the next source package to create.
The bootstrapping sequence is not required for all GPT packages, that is knowledge only the package developer will have. If the package requires special bootstraping instructions, or no bootstrapping at all, a package configuration file must be used. The key 'srcbootstrap' is used to inform the build tools that the package will not used the default bootstrapping sequence. If no bootstrapping is required, the key should be present with no value. For example, the following entry uses the default source package bootstrapping:
myproxy
    srcdir %SRCDIR%/myproxy
The next example specifies its own boot strapping sequence:
nws-client
    srcdir %SRCDIR%/nws
    srcbootstrap rm -f pkg_data_src.gpt pkg_data_src.gpt.server filelist.in.server filelist.in ;mv pkg_data_src.gpt.client pkg_data_src.gpt ; ln -s filelist.in.client filelist.in
And finally, this last bootstrapping example describes a package which does not require any source boot strapping:
product_x
	srcdir %SRCDIR/product/x
	srcbootstrap
The -buildpkg option can build the target source package or directory into binary form in the given flavor and install it to $GLOBUS_LOCATION. This is very similar to running gpt-build on the source package or source directory with the addition that the build tools will preform all necessary bootstrapping preparations on the source directory before compilation. In addition, the build tools can locate the source directory or source package from predetermined locations freeing the developer of this responsibility. The following usage applies:
uberBuild -buildpkg [ -compiler ] [ -srcdir ] [-pkgdir ] [ -fast ]
                    [ -flavor ] [ -pkgconf [ variable substitutions ] ]
                    [ package names ] [ src packages ]
The -compiler option species the compiler to use, for instance gcc32, gcc64 and vendorcc32 are common values.
The -flavor option specifies the flavor to build the package with. Common values for this option are pthr, dbg and dbgpthr. The value of this option is combined with the given compiler to determine the ultimate value. This option is not required as some package flavors only consist of the compiler used.
The -srcdir option specifies the source directory contain raw sources to build from. This option is not necessary with the -pkgconf option.
The -pkgconf option specifies a package configuration file previous generated from the source directory.
The -pkgdir option species where source packages should be placed.
The -fast option species that the build tools should make optimizations when possible. When building a package into binary form, an optimization is to:
Skip the build if the package is already installed to $GLOBUS_LOCATION
Use an available source package if one is available. This optimization avoids the bootstrap processing required when working on source directories
The last two items, "package names" and "src packages" refer to either the name of a package that exists in -srcdir or the name of a GPT source package such as globus_common-3.7.tar.gz
The -binpkg option is used to create binary packages from source directories, source packages or existing installations. The following usage applies:
uberBuild -binpkg [ -flavor ] [ -srcdir ] [-pkgdir ] [ -fast ]
                  [ - compiler ] [ -pkgconf [ variable substitutions ] ]
                  [ package names ] [ src packages ]
The -flavor option defines the flavor to build the package with. Common values are dbg, pthr and dbgpthr. The value to -compiler is combined with the value for -flavor for the ultimate flavor used, so -flavor is not required if you wish for no other options than the compiler in your flavor choice.
The -compiler option species the compiler to build the source with. Common values are gcc32, gcc64 and vendorcc32.
The -srcdir option specifies the directory containing raw package sources. This option is required unless -pkgconf is used.
The -pkgconf option species the package configuration file to use.
The -fast option specifies that optmizations should be used when available. In the case of creating binary packages, optimizations include using available binary packages and using prebuilt installed packages to satisfy the request. Without the -fast option, the complete build process is preformed.
The "pacakage names" and "src packages" options refer to names of GPT packages available in -srcdir and GPT source packages that are already available.
The -createbundle option can be used to create source and binary bundles. The following usage applies:
uberBuild -createbundle [ -src | -flavor ] [ -bundleversion ]
                        [ -bundlelabel ] [ -compiler ]
                        [ -pkgconf [variable substitutions] ]
                        [ bundle definitions ]
The -src option declares that the resulting bundles should be source bundles. Without this option, the bundles would be binary bundles.
The -flavor option defines the non compiler component of the flavor. Common values are pthr, dbg and dbgpthr. This option is not required.
The -bundleversion option gives the value that the resulting bundles should use for its version. Without this option, the value in the given bundle definition is used.
The -bundlelabel option gives the value the resulting bundle should use as its label. The label is used by the bundle for non GPT purpose plus the label is used as part of the name of the resulting bundle for identification purposes. Labels can be any alpha numberic combination.
The -compiler specifies the compiler to use for the binary bundle. This option is also necessary for the source bundle if the source bundle is created from raw source directories, as described in "Creating Source Packages."
The -pkgconf option specifies the package configuration file to use.
The "bundle definitions" are xml files which describe the contents of the resulting bundle.
Table of Contents
GPT provides a public PERL programming interface for use by software developers. This public interface allows for third-party use of internal GPT functionality without indepth knowledge of GPT's design. Many common tasks have been added to the public interface, many more will be added as needed. It is important to note that this is only API which GPT supports, all internal interfaces are subject to change without notice.
The GPT public interface is contained within a single PERL module called GPT.pm. Ideally, this should be the only GPT module that needs to be included in third-party products. This module translates its public interface into more-complicated internal GPT requests which are past to other GPT modules.
In order to use this module you must follow the standard PERL method for module locating by adding its location to your scripts @INC. In addition, the environment variables $GPT_LOCATION and $GLOBUS_LOCATION should be set prior to calling this module.
This function returns information about a given bundle definition.
Function Name: QueryBundleDef()
Inputs:
     bundledef => Location of bundle definition file
     key       => Value within bundle definition to query

Valid values for 'key' are:
     IncludedPkgs - Returns an array of name-flavor_type pkg tuples that are
                    explicitly listed as included in the bundle definition.
     ExcludedPkgs - Returns an array of name-flavor_type pkg tuples that are
                    explicitly listed as excluded in the bundle definition.
     Flags        - Returns an array of flags that are given in the bundle
                    definition.
     Name         - Returns a scalar that is the name assigned to the bundle.
     VersionLabel - Returns a scalar that is the version label assigned to
                    the bundle.
Examples:
    my @flags = GPTAPI::QueryBundleDef(bundledef => "client.gpt-bundle.xml",
                                       key       => "Flags");
    if ( grep /NoDeps/, @flags )
    {
        print "This bundle does not include dependent packages not";
        print "explicitly listed in IncludedPkgs\n";
    }

   print "This bundle only includes the following packages:\n";
   for my $pkg  (GPTAPI::QueryBundleDef(bundledef => "client.gpt-bundle.xml",
                                        key       => "IncludedPkgs"))
   {
       my ($name, $flavor, $type) = $pkg =~ m!(.+)-([^_]+)_(.+)!;
       print "Package Name is $name, Package type $type, flavor is $flavor\n";
   }
This function allows you to change the values within a bundle definition. Using this function will change the file itself.
Function Name: SetBundleDef()
Inputs:
     bundledef => Location of bundle definition file
     key       => Value within bundle definition to modify
     value     => New value for bundle definition
Valid values for 'key' are:
     IncludedPkgs - Change the list of packages explicitly included in the
                    bundle definition. See not below for format of value.
     ExcludedPkgs - Change the list of packages explicitly excluded in the
                    bundle definition. See not below for format of value.
     Flags        - Set the flags given in the bundle definition. Value must
                    be an array of scalars of valid bundle flags.
     Name         - Set the name of the bundle definition. Note that this is
                    not the name of the file the definition is stored in. value
                    must be a scalar.
     VersionLabel - Set the version label of the bundle definition. value must
                    be a scalar.

     * In the case of 'key' equals 'IncludedPkgs' or 'ExcludedPkgs', value
       must be an array of hashes with the following fields:
         pkgName  => Name of package
         pkgVer   => Package version
         pkgFlav  => Package flavor
         pkgType  => Package type
Examples:
     # Set the verion of all packages to 2.0
     my @inclpkgs = ();
     for my $pkg (GPTAPI::QueryBundleDef(bundledef => "client.gpt-bundle.xml",
                                         key       => "IncludedPkgs"))
     {
         my ($name, $flavor, $type) = $pkg =~ m!(.+)-([^_]+)_(.+)!;

         push @inclpkgs, { pkgName => $name,
                           pkgVer  => "2.0",
                           pkgFlav => $flavor,
                           pkgType => $type};
     }
     GPTAPI::SetBundleDef(bundledef => "client.gpt-bundle.xml",
                          key       => "IncludedPkgs",
                          value     => \@inclpkgs);
The function is used to query information about a given GPT package metadata file.
     Function name: QueryPkgDataFile
     Inputs:
          pkgdatafile => Location of package data file
          key         => value to query
          type        => used for 'key' equals 'Deps' to specify what type
                         of dependency

     Valid values for 'key' are:
          Name        - Returns a scalar with the name of the package
          Type        - Returns a scalar with the type of the package
          Description - Returns a scalar with the description of the package
          Deps        - Returns an array of name-flavor_type package tuples
                        which are the dependents of the given package.
          Setup_Name  - Returns a scalar with the setup name of the package
                        if one exists, undef otherwise
          Version     - Returns a scalar with the version of the package
          Flavor      - Returns a scalar with the flavor of the package

     * If the 'type' arguement is not set when 'key' equals 'Deps', all
       dependent packages are returned. Otherwise, only packages of dependency
       type 'type' are returned. Valid values for 'type' are:

          pgm_link, lib_link, data_runtime, doc_runtime, compile,
          pgm_runtime, lib_runtime, rtl_runtime, Setup

       Note that dependency listings are not recursive, the array of tuples
       only includes those dependent package explicitly listed in the package's
       metadata file. In order to recurse that list, the developer should make
       repeated calls to this function with the package data files of
       dependent packages.
Examples:
     my $pkgname = GPTAPI::QueryPkgDataFile(pkgdatafile => "pkg_data_src.gpt.in",
                                            key         => "Name");
     my $deppkgs = GPTAPI::QueryPkgDataFile(pkgdatafile => "pkg_data_src.gpt.in",
                                            key         => "Deps",
                                            type        => "compile");
The function is used to query information about a given GPT package.
     Function name: QueryGPTPkg
     Inputs:
          gptpkg => Location of package
          key    => value to query
          type   => used for 'key' equals 'Deps' to specify what type
                    of dependency

     Valid values for 'key' are:
          Name        - Returns a scalar with the name of the package
          Type        - Returns a scalar with the type of the package
          Description - Returns a scalar with the description of the package
          Deps        - Returns an array of name-flavor_type package tuples
                        which are the dependents of the given package.
          Setup_Name  - Returns a scalar with the setup name of the package
                        if one exists, undef otherwise
          Version     - Returns a scalar with the version of the package
          Flavor      - Returns a scalar with the flavor of the package

     * If the 'type' arguement is not set when 'key' equals 'Deps', all
       dependent packages are returned. Otherwise, only packages of dependency
       type 'type' are returned. Valid values for 'type' are:

          pgm_link, lib_link, data_runtime, doc_runtime, compile,
          pgm_runtime, lib_runtime, rtl_runtime, Setup

       Note that dependency listings are not recursive, the array of tuples
       only includes those dependent package explicitly listed in the package.
       In order to recurse that list, the developer should make repeated calls
       to this function with dependent packages.
Examples:
     my $pkgname = GPTAPI::QueryGPTPkg(gptpkg => "client-1.0.tar.gz",
                                       key         => "Name");
     my $deppkgs = GPTAPI::QueryGPTPkg(gptpkg => "client-1.0.tar.gz",
                                       key         => "Deps",
                                       type        => "compile");
Table of Contents
This is the process used by gpt-install and gpt-build to determine updates for bundles and packages
At the start of an update operation, there are two sets of bundles and two sets of packages as well as the -force flag:
- InstalledBundles
Set of bundles that are already installed in the directory pointed to by $GLOBUS_LOCATION
- InputBundles
Set of bundles passed in to the command line from the user.
- UnaffiliatedInstalledPackages
Set of packages that are already installed in the directory pointed to by $GLOBUS_LOCATION which are not "owned" by any InstalledBundles
- UnaffiliatedInputPkgs
Set of packages passed in to the command line from the user. These packages are not 'owned' by any InputBundles
Bundles create with GPT older than version 3.0 are treated as a collection of Unaffiliated Input Packages since they are not versioned.
The InputBundles and InstalledBundles need to be compared and sorted. The result of this generates the following bundle sets:
- NewerBundles
This set is all of the bundles in InputBundles that are a new version of the same bundle in InstalledBundles
- OlderBundles
This set is all of the bundles in InputBundles that are an old version of the same bundle in InstalledBundles
- AddedBundles
This set is all of the bundles in InputBundles that have never been installed
- UntouchedBundles
This set is all of the bundles in InstalledBundles that do not have any version of themselves present in InputBundles
- ReplacedBundles
This set is all of the bundles in InstalledBundles that do have a version of themselves present in InputBundles
The -force flag now is used to determine the replacement set of bundles which we will call ToReplaceBundles. If the -force flag is true then the set will consist of both NewerBundles and OlderBundles. Otherwise the set consists of only NewerBundles. If OlderBundles is not empty and the -force flag is false then we transition into an error state which will cause nothing to be installed. However even with this error state, the algorithm continues so that all errors are collected.
Now the installation picture is clear at the bundle level. After the process is completed, the set of installed bundles will be the union of ToReplaceBundles, AddedBundles, and UntouchedBundles. We will call this set NewInstallationBundles. The set initially contains the bundles from UntouchedBundles. Every bundle in ToReplaceBundles and AddedBundles is then scanned for package conflicts. The scan is done by creating package sets for the sorting packages algorithm. The packages from every bundle in NewInstallationBundles are designated as the OldPackageSet. The packages of the bundle being scanned are designated as the NewPackageSet. After the sorting is done the scanned bundle is added to NewInstallationBundles. Any packages that are in the ToReplacePackages set are considered conflicts. If conflicts are found then the process transitions to an error condition. Processing continues even with errors until all of the conflicts are found.
The package sort is called one more time with UnaffiliatedInputPackages designated as the NewPackageSet. As before, any packages that are in the ToReplacePackages set are considered conflicts. If conflicts are found then the process transitions to an error condition. Processing continues even with errors until all of the conflicts are found.
At this point a package set can be created from NewInstallationBundles and UnaffiliatedInputPackages. This set should be scanned for file conflicts.
After the file conflicts, All possible errors have been checked for. If any errors exist, they are reported and the process ends.
The bundles in ReplacedBundles contain packages that are candidates for removal or replacement. We will call this set ToBeRemovedPackageSet. To generate this set, the package sorting algorithm is called with OldPackageSet generated from ReplacedBundles and NewPackageSet generated from the package union of NewInstallationBundles and UnaffiliatedInputPackages. After the algorithm is completed, the UntouchedPackages set will be the packages that will no longer exist in the installation. Because of this, the set needs to be run through the uninstall algorithm. The union of modified UntouchedPackages set and ReplacedPackages set is the ToBeRemovedPackageSet.
The ToBeAddedPackageSet consists of the package union of ToReplaceBundles, AddedBundles and UnaffiliatedInputPackages.
The following algorithm sorts two sets of packages based on the name and version numbers of each package. Given two sets of packages OldPackageSet and NewPackageSet, the packages are sorted as follows:
- ToReplacePackages
This is a list of packages from NewPackageSet that will replace packages in OldPackageSet.
- AddedPackages
This is a list of packages from NewPackageSet that do not exist in OldPackageSet.
- UntouchedPackages
This is a list of packages from OldPackageSet that have no equivilent in NewPackageSet.
- ReplacedPackages
This is a list of packages from OldPackageSet that will be replaced by packages in NewPackageSet.
The following algorithm is used to determine whether a package should be replaced or not. The algorithm assumes that the package and its replacement have the name. The flavor and package type of the package can be different. It also checks two -force and -loose. The following are the tests are conducted on the packages. These need to be run in order:
Replace the package if -force is true and the flavors and package types are the same.
Don't Replace the package if it is newer than its replacement.
Replace the package if the replacement is newer and the flavors and package types are the same.
Replace the package if the versions and flavors are the same and the package type for the package is pgm_static. Also the flavor cannot be set to noflavor
Replace the package if the -loose flag is true and the package types for the package is pgm or pgm_static. The -loose flag is only valid if the package belongs to a version 2.x bundle or is unaffiliated.
Add the replacement to the installation if its package type is rtl or dev and the flavors for the package and the replacement are different. Packages of this type can be collocated without file conflicts.
Don't Replace for any other cases.
This algorithm is used for uninstalling bundles and packages with gpt-uninstall. The key to this algorithm is that only those packages which do not fulfill dependencies to other packages and are not owned by any installed bundles can be deleted. The algorithm starts with two sets of packages, two sets of bundles, the -force flag.
- ToBeUninstalledBundles
List of bundles the user wants to remove from an installation.
- ToBeUninstalledPackages
List of packages the user wants to remove from an installation.
- InstalledBundles
List of bundles that are currently installed.
- InstalledPackages
List of packages that are currently installed.
The algorithm is outlined in the following steps:
The ToBeUninstalledBundles set is expanded to packages which are added to the ToBeUninstalledPackages set.
This check is skipped if -force is true. Each package in ToBeUninstalledPackages is examined to determine which bundles include the package in their packaging list. If any of these bundles are not in ToBeUninstalledBundles then the package is removed from ToBeUninstalledPackages.
This check is skipped if -force is true. Each package in ToBeUninstalledPackages is examined to determine if the package provides dependencies to other packages in InstalledPackages. If any of these dependent packages are not in ToBeUninstalledPackages the package is simply from ToBeUninstalledPackages.
ToBeUninstalledBundles and ToBeUninstalledPackages are passed to the code that does the actual removals.
Table of Contents
<?xml version="1.0" encoding="UTF-8"?>
<!DOCTYPE GPTBundleData SYSTEM "gpt_bundle.dtd">
<GPTBundleData Name="newfoo" >
<BundleInfo >
<Description >Bundle Definition for GPT Book Exercise</Description>
<ContactInfo ContactEmail="gpt-help@ncsa.uiuc.edu" ContactName="Michael Bletzinger" />
<BundleDocs BundleDocsDesc="EMPTY" BundleDocsURL="/gpt" />
</BundleInfo>
<BundleReleaseInfo >
<BundleStability Release="Experimental" />
<BundleVersion Age="0" Major="1" Minor="0" />
<VersionLabel >2.0</VersionLabel>
<TypeOfBundle ContentsType="gpt" />
</BundleReleaseInfo>
<PackageList >
<IncludedPackages >
<Package PackageFlavor="gcc32" PackageName="globus_common" PackageType="pgm" PackageVersion="3.5" />
</IncludedPackages>
<ExcludedPackages >
</ExcludedPackages>
<PackageFlags >
</PackageFlags>
</PackageList>
</GPTBundleData>
<?xml version="1.0" encoding="UTF-8"?>
<!DOCTYPE GPTBundleData SYSTEM "gpt_bundle.dtd">
<GPTBundleData Name="newfee" >
<BundleInfo >
<Description >Bundle Definition for GPT Book Exercise</Description>
<ContactInfo ContactEmail="gpt-help@ncsa.uiuc.edu" ContactName="Michael Bletzinger" />
<BundleDocs BundleDocsDesc="EMPTY" BundleDocsURL="/gpt" />
</BundleInfo>
<BundleReleaseInfo >
<BundleStability Release="Beta" />
<BundleVersion Age="0" Major="3" Minor="4" />
<VersionLabel >MEB-2.5b1</VersionLabel>
<TypeOfBundle ContentsType="gpt" />
</BundleReleaseInfo>
<PackageList >
<IncludedPackages >
<Package PackageFlavor="gcc32" PackageName="globus_common" PackageType="pgm" PackageVersion="3.5" />
<Package PackageFlavor="gcc32" PackageName="globus_common" PackageType="rtl" PackageVersion="3.5" />
<Package PackageFlavor="noflavor" PackageName="globus_common_setup" PackageType="pgm" PackageVersion="2.1" />
<Package PackageFlavor="gcc32" PackageName="globus_gsi_callback" PackageType="rtl" PackageVersion="0.3" />
<Package PackageFlavor="gcc32" PackageName="globus_gsi_cert_utils" PackageType="rtl" PackageVersion="0.4" />
<Package PackageFlavor="gcc32" PackageName="globus_gsi_credential" PackageType="rtl" PackageVersion="0.5" />
<Package PackageFlavor="gcc32" PackageName="globus_gsi_openssl_error" PackageType="rtl" PackageVersion="0.2" />
<Package PackageFlavor="gcc32" PackageName="globus_gsi_proxy_core" PackageType="rtl" PackageVersion="0.3" />
<Package PackageFlavor="gcc32" PackageName="globus_gsi_proxy_ssl" PackageType="rtl" PackageVersion="0.1" />
<Package PackageFlavor="gcc32" PackageName="globus_gsi_sysconfig" PackageType="rtl" PackageVersion="0.3" />
<Package PackageFlavor="gcc32" PackageName="globus_openssl" PackageType="rtl" PackageVersion="0.10" />
<Package PackageFlavor="gcc32" PackageName="globus_openssl_module" PackageType="rtl" PackageVersion="0.2" />
<Package PackageFlavor="gcc32" PackageName="globus_proxy_utils" PackageType="pgm" PackageVersion="0.5" />
<Package PackageFlavor="noflavor" PackageName="globus_trusted_ca_42864e48_setup" PackageType="pgm" PackageVersion="0.5" />
</IncludedPackages>
<ExcludedPackages >
</ExcludedPackages>
<PackageFlags >
</PackageFlags>
</PackageList>
</GPTBundleData>
Table of Contents
This section lists the macros that GPT pays a attention to. The macros are used only during builds with gpt-build.
These macros are used in the build instructions of packages.
Table C.1. GPT Build Macros
| Name | Description | Example |
|---|---|---|
| INSTALLDIR_GPTMACRO | The installation directory that GPT is building into | <Build_Step> ./configure --prefix=INSTALLDIR_GPTMACRO </Build_Step> |
| FLAVOR_GPTMACRO | The flavor label that GPT is building with | <Build_Step> ./configure --with-flavor=FLAVOR_GPTMACRO </Build_Step> |
| BUILDDIR_GPTMACRO | The build directory that GPT is building in | <Build_Step> cd BUILDDIR_GPTMACRO </Build_Step> |
| STATIC_LINK_GPTMACRO | Set to 'yes' if GPT is linking to static libraries or 'no' if GPT is linking to shared libraries | <Build_Step> if test "STATIC_LINK_GPTMACRO" = "yes"; then ./configure --enable-static fi </Build_Step> |
| MAKE_GPTMACRO | The location of GNU make that GPT is using | <Build_Step> MAKE_GPTMACRO install </Build_Step> |
| CONFIGOPTS_GPTMACRO | Switches defined by the package and the flavor which are passed into the configure build step. | <build_step> ./configure CONFIGOPTS_GPTMACRO </build_step> |
| CONFIGENV_GPTMACRO | Variables that need to be set before running configure. The values of these variables are determined by the package data and the flavor. All of the available variables are used. | <build_step> CONFIGENV_GPTMACRO ./configure --with-flavor=FLAVOR_GPTMACRO </build_step> |
| RUN_FLAVOR_INSTALL_GPTMACRO | GPT function which moves header files in the INSTALLDIR_GPTMACRO/include into a subdirectory named with the flavor | <Build_Step> RUN_FLAVOR_INSTALL_GPTMACRO </Build_Step> |
| RUN_FLAVOR_MAKEFILES_GPTMACRO | GPT function which adds the flavor name to shared library names that are found in configure scripts, Makefiles, files ending with the 'mk' or 'mak' extensions, and files found in a shlib directory. Shared library names need to be listed in the Macro_Args attribute. The example shows the function being executed for the openldap build flavoring both dependent security libraries and the libraries built by openldap. The libraries are listed by soname. | <Build_Step Macro_Args="libs='ssl crypto sasl lber ldap ldap_r ltdl lutil'"> RUN_FLAVOR_MAKEFILES_GPTMACRO </Build_Step> |